Showing posts with label Lalaland Crafts. Show all posts

Thursday, November 16, 2017

Tutorial Thursday - Chocolate Box

Hi La-La Land Crafts fans!!!!!!
Irene here, and today I will show you how to make a Chocolate Box.


You will need to make it:
* a rectangle - design paper (your choice) - size 15,2x24cm
* a square - design paper (your choice) - size  9x9cm
* a acetate sheet rectangle
* 2 x Two Trees Die ** use design paper (your choice)
* 1 x Mini Christmas Wreath Die **
* 2 x Postage Stamps Die **
* 3 x Stitched Nested Circles **
* 2 x Joy Die **
* glue
* distance foams
* scissors
* white Media Gesso
* Vintage Seam Binding in Blue
Step-by-Step:
 First cut box base sections to the following measurements:
Plain cardstock (or design paper) - 15,2x24cm

On the 24cm wide side score at: 1,4cm, 10cm, 1,5cm, 10cm and then score again 1,5cm
On the 15,2 high side score: 1,4cm, 1.5cm, 10cm, 1.5cm, and then score again 1,4cm
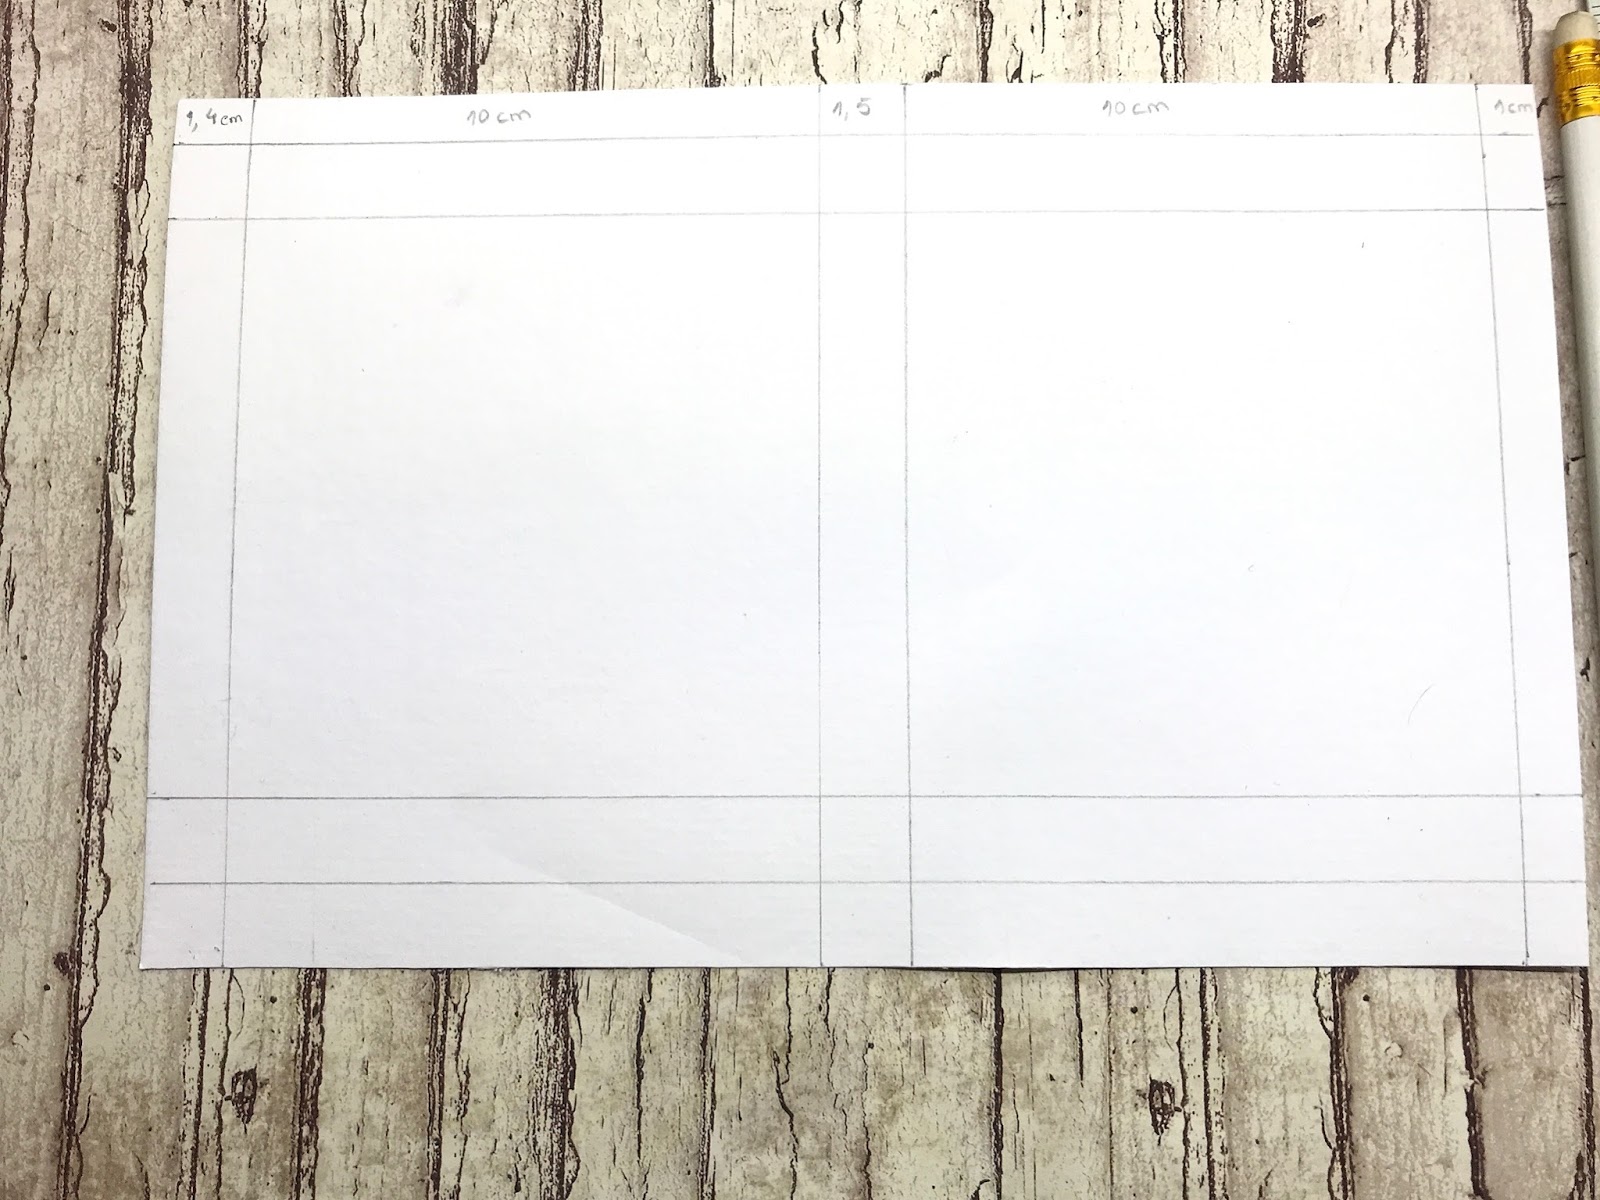
Use a bone folder to fold all the score lines. 
 Trim the shaded sections as illustrated above from your chocolate box base to create your "box" tabs as illustrated below:
Now I must create  a window in to my chocolate box, so I score 2 squares at: 1,5cx1,5cm as illustrated below:
after creasing the first few lines, cut the diagonal lines inside the squares so as to create a small ledge in the middle of your box, as illustrated below:
well and the most complicated part has passed and now we will move to the easier part that will be to create an overlap in the salience that you just created using a 9x9cm square, as illustrated below:
Score at: 1cm, 6,9cm, and again 1cm, and cut off the side angles...
This is what it should look like, as illustrated below:
Now I created from the decorative paper the box where I will put four chocolates... and wrap my box with acetate and the measures for this rectangle with 10x24cm, I will score as the following measurements:: 1,5x10x1,5x10x1,5cm and glue it together.
Now it's time to decorate!!!!
We can change the cutter by creating a border to create dimension to our scene

For the finished touch I use a white Media Gesso and Vintage Seam Binding in Blue...

A preview of my Chocolate Box...

That's all from me today! I hope you enjoyed my tutorial. 
Until next time and have a good day!
Irene Mendes

 Click on the buttons below to find us on these social media sites:


Thursday, September 8, 2016

Bubble Christmas Card Tutorial


Hello, there!
Henryka here, with Christmas Card Tutorial.
I know, we have few more months to Christmas and you can think, is too early for that kind of inspirations, but better to be prepared.

I have for you a video, how to make a Bubble Christmas Card.

What you will need to make it:

5 sets of Winer Flowers, 5 big ones and 5 small ones
5 sets of Winter Branches
white card for a base
two circles approx. 12cm and 11cm diameters
scissors, glue, distance foam, glitter, ribbon and jute twine

First, what you need, you have to cut from white paper your base, bubble shape.
I am using unused CD to make a pattern.
When you have your base you can start to make a card.
Please have a look at my video:


And here are some closer photos:


Thank you for your attention, hope you like it.
I wish you a good Thursday!
xxx


Monday, July 18, 2011

One for the Boys-Use brads or eyelets!

Hey all! it's me Trisha and I'm hosting this week's Inspirational Monday. Every Monday we are showcasing a new and creative challenge here at La-La Land Crafts' site! The challenge this week is to make a creation for a male, incorporating brads or eyelets in your creation!  Sounds like fun doesn't it?Check out what our creative team has come up with this week:

Arlene used: Babeball Luka

Color Medium: Copic Sketch Markers
Skin: E000, E00, E21, E11, BV00
Hair: YR21, YR24, E25
Cap rim: button on cap, shirt, socks: E15, E17, E19
Stitch on baseball: R14
Shoes: N0, N3, N5
Baseball cap, pants: B32, B34, B37
Baseball mitt: E40, E43


Coloured with Prismacolor pencils

Copics used -
Skin: E000, E01
Hair: E27, E49
Shirt & Tie: B21, B23, B39
Suit: E33, E35, E51


Trisha used Fisherman Luka:
Copics used:
Hat and shorts: E41, E43
Shirt: Marine green Prisma Color Pencil, YR68,YR61
Pail, jig and shoe tips: C1, C3, C5, C7
fishing pole: E33, Y32
Hair: E33, E35, E39
Skin: E000, E00, E11, E21


Skin: E000, chalk
Hair: E29, E25, E33,
Hat & Clothes: E29, E25, E33, E37, C3, Liquid Applique
Box: E55, chalk, B93, YR04, R29

Tuffy:
E000, chalk, E25, E55, C3, R29, R24


Copic markers used:
Skin - E21, E00, E000
Hair - E44, E43, E51
Pants - B97, B95 B91
Shirt and shoes - C3, C1, C00, 0
Coat - C7, C5, C3, C1 C00
Truck - E09, E07, C5, C1 Y15, E13

Don't forget to upload your beautiful creations to our Customer Gallery and join us on Friday to view more of the team's wonderful creations following this same theme!  Hope u like and have a great week! :)