Tutorial Thursday - Rain Forest Card
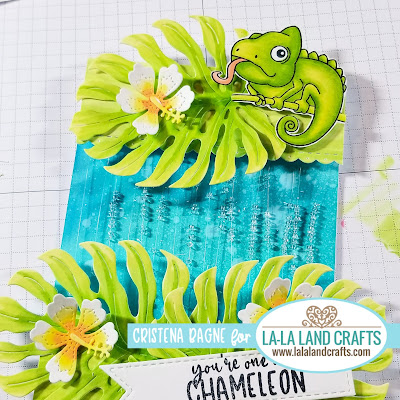
Hello crafty friends, Cristena here and it's Tutorial Thursday! Today I'm sharing how I made this fun "Rain forest" card. I was inspired to make this from my fellow La-La Land Crafts design team member Tina.
You will need:
Adhesive tape runner
Foam Tape
white cardstock
Distress Oxide Ink
Fishing line
160 clear seed beads
water
white ink/paint/Copic opaque white
Copic Colors:
Chameleon: YG21, 23, 25, G24
Tongue: R05, 02, YR12
Monstera Leaves: YG21, 23, 25
Hibiscus Flowers: Y11, 02, 05, RV13
Distress Oxide Ink: Mermaid Lagoon and Peacock
To cut ahead of time...
- I started out with white cardstock 4 1/4" x 11" folded in half for the card base
- I have one layer under the main layer that is the rainforest background which is 4 1/4" x 5 1/2"
- The top layer for the leaves and flowers are white cardstock. You will need 3 of the Monstera Leaves and 3 Hibiscus flowers.
- You will also need 1 of the largest Scalloped Rectangle die cuts out of white cardstock (I colored mine) or you can just use green cardstock if you don't want to color it.
- (2) white or any color really cardstock 3/4 x 4 1/4"
1. For the background, I started out with the 4 1/4 x 5 1/2 white Neenah 110lb cardstock. I used Mermaid Lagoon Distress Oxide Ink along the top half of the cardstock
2. I did the same with Peacock Feathers Distress Oxide Ink and blended it into the Mermaid Lagoon I had already placed down.
Using the Mermaid Lagoon Distress Oxide Ink again along the bottom and made sure all the colors were blended.
Spray some water on it. You can also just flick water or drop it from above if you like to get the type of water droplets you would like to have
Use a paper napkin to gently blot the excess water off.
If you get your cardstock just a bit to wet you can also take a heat gun to it as wel
You can use white paint, Copic Opaque white or even white ink to flick white splatters onto your cardstock. I sometimes use white titanium ink from Amsterdam. You can see me using it in my videos to make this background and it can be found at Hobby Lobby.
after you get the results you would like to have set it aside to dry.
Next, take the 3/4 x 4 1/4 cardstock pieces and draw a line down the center horizontally... about 3/8 of an inch.
Then, mark off along the bottom at every 1/4 inch
After everything is marked you should have 16 lines. Cut each of the marks up to the centerline on just one side as seen in the photo. The bottom cardstock is marked the top one has the cuts.
do this on both pieces.
use 3d foam tape or squares, whatever you have to line across the top of each piece of cardstock. I do this so that the beads do not have to struggle to move back and forth.
Place each of the 3/4 x 4 1/4 pieces along the top and the bottom of the rainforest background cardstock. Have all ends meeting with the fringe side facing out away from the center of the card.
I feel that it is faster and easier for me to bead all the beads at once on the thin fishing line. Then, when I go to string the beads on the card it is just done and I just have to do the stringing. I also don't cut the fishing line from the spool until I have strung the card in case I have an accident.
If you like you can start out and cut the amount of line that you think you will need and tape it on the back like this and then string the seed beads as you go.
However, I did all my beading first and now in the photo you see is the end of the fishing line. It is hard to tie knots in fishing line so I use washi tape and you can use scotch tape if you wish to hold the end to the backside of your rainforest background.
After you have it taped down in the back bring it up between your rainforest background and the 3/4 x 4 1/4 (which I will call fringe cardstock now) to bring up through the bottom side of the first slit.
count out 10 seed beads for each time you weave the fishing line through the fringe cardstock. you will just weave it behind from top to bottom each time until finished. don't worry it will buckle just a bit.
When finished going all the way across cut the end of the line about an inch to two inches away from the card.
The same way you started is the same way you will finish. Bring the end of the fishing line to the backside of your rainforest background and secure with tape.
Now it is time to adhere you rainforest background to your 4 1/4 x 11 cardstock base that you have folded in half.
You can either put the adhesive on the backside of your rainforest background or you can put it on the top of the card base. Since it has buckled a bit tape the heck out of it! but I wouldn't use a liquid adhesive.
As you can see it does lay flat once it is down.
I didn't want the white of the fringed cardstock to show through the Monstera leaves. So this is where the largest of the Scalloped Rectangles come in. I colored it using YG21, 23, and 25. I didn't do a super fantastic perfect job because it wasn't really going to be seen. It was just there to hide things. and I cut it in half from top to bottom.
I don't want the beads to have issues getting stuck on Monstera leaves or on the Scalloped Rectangles. So, I did 2 layers of 3D foam across the white fringe cardstock which also helps to keep everything in place.
I placed the first half of the Scalloped Rectangle down with the scalloped edge at the top or facing the center of the card. I did the same with the other side of the scalloped rectangle on the top half of the card.
After getting the Scalloped Rectangles on the card and secure I cut off the excess.
The last thing to do was decorate. I colored the Monstera Leaves with YG21, 23, 25 (so they blend with the Scalloped Rectangle. I also colored the little Chameleon from the Never Change clear stamp set with the same colors but added in a little G24 for more shading.
The Hibiscus flowers I used Y11, 02, 15, and RV13 for the centers.
I used the Long Flags Die for the sentiment which fit PERFECTLY!
Here are a couple more close up photos for you
As you can see the RV13 turns an orangeish pink when mixed with the Y's
I really hope that you enjoyed the tutorial and will have a fantastic time making your own rainforest cards as well.
Inky Hugs,
Cristena
Click on the buttons below to find us on these social media sites:


