Monday, July 31, 2023

Inspirational Monday - Use Candy Shoppe Release


Hello everyone! Welcome to Inspiration Monday!

Amanda here with you today to share some fantastic projects from Team Monday. They created them, especially as an inspiration for you!

Today our theme is: Use Candy Shoppe Release

~ Here are the incredible design team creations ~ 


Card by ALLISON

PRODUCTS USED


 SPECTRUM NOIR
Green CG3,2,1
Purple LV3,2,1 White Gel Pen
Blue AB3,1
Orange BO3,1
Skin TN2,GB1,FS9 

Card by AMANDA

PRODUCTS USED

Distress Ink
Girl skin- Vintage Photo, Antique Linen
Hair- Saltwater Taffy
Eyes -Peacock Feathers
Shirt - Shirt & Pants Wilted Violet
Sucker- Wilted Violet, Mustard seed


We hope that you are inspired to try out your own creations with the unique stamps and dies from La-La Land Crafts! 

Make sure to join our LLLC FAN GROUP on Facebook for more ideas, 
inspiration and general chit-chat about our products!

Hoping you all have a great week of Creating!
Jennifer and Team Monday

Click on the buttons below to find us on these social media sites:


Friday, July 28, 2023

Inspiration Friday - Use Sweets Release


Hello everyone! Welcome to Inspiration Friday!

SHERI here with you today to share some amazing projects from Team Friday. They created them, especially as an inspiration for you!

Today our theme is:  USE SWEETS RELEASE

Here are the awesome design team creations 


Card by SANDRA


PRODUCTS USED

COPICS
Skin: E000, E00, E04, E11, E13, E21, R20, Polchromos Medium Flesh
Hair: E49, E51, E53, E55, E57, E59
Dress: V01, 04, 05, 06, RV52, 55, 63, 66
Shoes: E43, E44, E47
Bowl: N0, N1, N2
Sweets: B00, B01, B02, B04, YG07, G09, G14, YR16, Y13, 3Y5, Y38
Panda: N0, N1, N2, N6, N7, N9, R20, Polychromos Medium Flesh
Balloon: RV10, RV21, RV23, RV25, RV29
Greenery: YG05, 07, G09, G14, G28, RV21, RV23, RV25

Card by SHERI

COPICS
Girl:
E21, E02, E00, E000
Cheeks: R21, R20
Hair: Hair: E09, YR27, YR23
Clothes: V15, V12, V01, Y15, Y08, Y02, RV04, RV02
Candy: Y08, Y06, B05, B02, B00, YG05, YG03, YG01: RV55, RV52
Boy: E21, E02, E00, E000
Cheeks: R21, R20
Hair: Hair: E09, YR27, YR23
Clothes: BG13, BG11, 15, Y08, Y02, B04, B02
Candy: Y08, Y06, B05, B02, B00, YG05, YG03, YG01, RV55, RV52

Card by TAMARA


DISTRESS OXIDE INK PADS
Skin: Vintage Photo
Cheeks: Worn Lipstick
Pink: Picked Raspberry
Purple: Seedless Preserves, Villainous Potion
Yellow: Fossilized Amber
Orange: Spiced Marmalade
Green: Lucky Clover, Mowed Lawn
Blue: Salty Ocean


PRODUCTS USED

COPICS
Pandas - E44, E43, E53, E50, RV14, R22, R20, R00, 100, T7, T5, T3
Balloon and Sucker - RV69, RV66, RV19, RV14, RV13, RV11
Hard Candies - YR24, Y38, Y35, E32

We hope that you are inspired to try out your own creations with the amazing stamps and dies from 
La-La Land Crafts

Make sure to join our LLLC FAN GROUP on Facebook for more ideas, 
inspiration and general chit-chat about our products!

Hoping you all have a great week of Creating

SHERI and Team Friday

Click on the buttons below to find us on these social media sites:


Thursday, July 27, 2023

Tutorial Thursday - Candy Explosion Box w/ Drawers


Hello everyone! 
Kristine here to share a sweet tutorial with you!

Today's tutorial is:  Candy Explosion Box w/ See-Thru Drawers


Today's project is not a quick one - but well worth the time put into it!  I wanted to create something special using the New Sweets Release!  These are so great for BIRTHDAYS, HALLOWEEN or CHRISTMAS just to name a few!  In hindsight, I prolly should've recorded a process video of this as there's quite a few photos (you can find others on YT), but here's a short clip of this box...


If you cannot view here's a link to the short clip 

PRODUCTS USED

COPICS
Greys: W7, 5, 3, 2
Reds: RV02, 10, 04, 06; R22, 24, 35,
Yellows: Y11, 13, 15, 19
Purples: V15, 12
Blues: B0000, 02, 05; BG53
Greens: G20; YG03, 13

~ now for the tutorial you have been waiting for ~ 

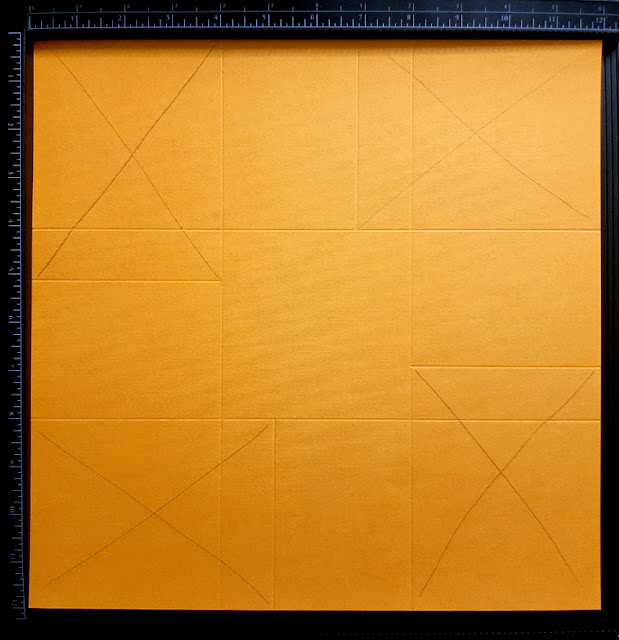
1.  Creating the Box Base:

--I started with a 12" square sheet of cardstock and scored at 4" and 8" - turned it 90 degrees and scored the same again.

--Next, I scored it 6-7/8" just down to that score line.  Repeat on remaining 3 sides.

--CUT the sections marked with an "X"


2. Decorating base 

--CUT (4) patterned paper rectangles at 2-5/8" x 3-3/4" and attach to OUTSIDE panels

--CUT (1) patterned paper square at 3-7/8" and attach to middle of INSIDE square (you'll FLIP this over to add the center square)


3.  Creating Drawer Casings:

***NOTE:  I wanted the top of my drawers to be see-thru as it's more fun for recipient to SEE the yummy candy as soon as you open the box, HOWEVER, if you want to skip that part, you can just cut a piece of patterned paper at 2-5/8" x 3-3/4" and attach to top of each casing.  

--CUT (4) at 4" x 8-1/4" and score along 8-1/4" side at 2-3/4, 3-7/8", 6-5/8" and 7-3/4"

--Using the largest Rounded Stitched Rectangle die, center it on the section pictured below and tape with a low-tac tape.  Run it through die-cut machine.  Repeat for remaining 3 drawer casings.

--CUT (4) pcs of acetate 2-11/16" x 3-15/16"  and attached  to the BACK SIDE of casing with 1/8" Scor Tape or very sticky 2-sided tape.  


--Apply glue to the flap and fold over the opposite side and attach.  Run a bone folder over it a few times or your fingers. Repeat with remaining drawer casings.


--Apply Scor Tape and/or glue to the backs of casings and attach to the INSIDE sections as pictured below.


4.  Decorating Drawer Casings

***TIP***  You will want to pay attention to which pattern is on the outside panel of the box because when it's all closed up, the SIDES of the casings will be showing right next to the outside box panels!  Only matters if you are mixing patterns.

--CUT (8) pcs of patterned paper at 3-13/16" x 15/16" and attach to each casing side 


5.  Creating the Pull Out Drawers

--CUT (4) at 6-1/16" x 4-3/4" and score each at 1-1/16" on all 4 sides

--Working on the bottom righthand corner, CUT on score line just up to score line, then miter the far right edge (only) of tab up to the score line.  Rotate drawer and repeat process until you have 4 flaps.

--*optional:  Punch a 1/2 circle from one of the short ends on each of the 4 drawers.


--Apply glue to all flaps and tuck inside drawer sides.  


We're ALMOST DONE!!  ☺♥

***This next part is completely optional... but I noticed an empty space when all the drawers are folded up, so I thought I'd take advantage of that space by adding a GUMBALL SHAKER!  If you want to skip this step, go to step #7 to create the lid!

6.  Double Sided Gumball Shaker 
(come on... you know you wanna!  LOL ☺)

--Hold your Gumball Machine pieces (2 big dies, or use the die cuts) so that they are overlapped and place a piece of window sheet/acetate over it and trim the acetate so it's just barely smaller than the outside edge of the dies except don't cut it across the bottom of machine base, just cut it straight down so you have a good 2" (give or take) longer as pictured below.  Repeat to make a 2nd.

**Note:  You can easily hold just one die at a time to make cutting easier, however the acetate will be all one piece!  


--CUT 2 complete gumballs machines (I cut 2 different colors cuz... ya know me and rainbow colors!) and glue the pieces to the acetate strips you just cut.

--On the orange machine, I wanted the lever to be on same side as the purple when they get attached, so I CUT off the lever on orange one and glued it to the left side.  What looks like white is actually silver metallic cardstock.

--Score the acetate right at the base of the gumball machine (on each). 


--Add 1/8" foam strips around the back of ONE of the machines as pictured.  

--DIE CUT Small Candies in various colors and add.  Attach the 2nd machine on top, lining it up.  


--Bring all 4 drawers up in closed position and with a pencil, lightly trace the square in center.


--Measure the width of your acetate strip and with a craft knife, CUT a slit diagonally in center of the square you drew. 


--Insert both of the acetate bases of your gumball machines into that slit.  The following pic shows the very bottom of my box.  I added Scor Tape on the acetate (box side) removed backing and pressed them opposite each other  (see photo below).

--CUT a piece of thick cardstock (I used 110 lb white) to 3-7/8" and glued to the bottom to cover up acetate and make the box more sturdy.  


7.  Creating the Lid:

--CUT a pc 6-1/2" square and score at 1-1/4" on all 4 sides.  Repeat the same process as the drawers for cutting the flaps of lid and glue/assemble.


--DIE CUT (4) with Canopy die in various colors.  

--To attach canopies, I added Scor Tape to the TOP back edge, then a thin foam tape (guessing 1/16"?) and a couple rows of 1/8" foam strips to make the bottom part really stick out for that awning vibe. ☺


(I started with pink and orange but there wasn't enough contrast, so I ended up attaching blue over top of all.)

--The sides of canopy overlap a bit, so I trimmed off with scissors at an angle so they meet up as pictured.


8.  Decorating the Box

--DIE CUT Hard Candies in various colors and add foam strip to back and place just under the cut out on drawers --- they make cute "handles" whether they're actually functional or not?  ;oP

--The Candy Shoppe Die is cut from Lilac and white glittered cardstock. 

--The rest you can view in photos.  If you have any questions, please leave me a comment below!  


ARE YOU STILL HERE??!!  YAY!! ☺   

Thank you for sticking with me - I know this was a rather long one, but if you're still reading, maybe that means you are interested in creating one for yourself?! Whether you recreate this or not, I do hope you are inspired to get crafty with your favorite La-La Land Crafts products!
Crafty hugs to you all!

~Kristine

Make sure to join our LLLC FAN GROUP on Facebook for more ideas, 
inspiration and a general chit chat about our products!


Click on the buttons below to find us on these social media sites: