Friday, November 29, 2013

Inspiration Friday - Pink Christmas


Hi there all you LaLaLanders. It's Tracey here today bringing you this week's Inspiration Friday.

Pink Christmas

We have lots of lovely projects to showcase from Team Friday.

Stamp: Santa Marci
Copic Markers: 
skin - E000, 00, 21, 11, 04, R30, 11
Outfit - RV000, 00
Hair - E40, 41, 43
Bear - W0, 1, 3
Candy cane - R81, 83, C000, 1
Holly - G21, 24, YG63
Bedspread - distress ink / spun sugar, Victorian VelvetTree - spun sugar


Vicky
Copic Markers & Prisma
Skin ~ E000, E00, E21, R11 & R20Hair ~ E50, E51, E53 & Light Umber Prisma Pencil
Dress & Ribbons ~ RV000, RV00, RV10, E40, E41, E42 & Dark Brown & Process Pink Prisma Pencils
Boots & Garland ~ E40, E41, E42 & Dark Brown Prisma Pencils


Copic Markets
Skin- E000, E00, E21, E11, R20
Hair- Y21, YR24, E15
Socks- W0, W2, W4
Shoes- E71, E74, E77, E79
Shading- RV52, RV55, E71, E74
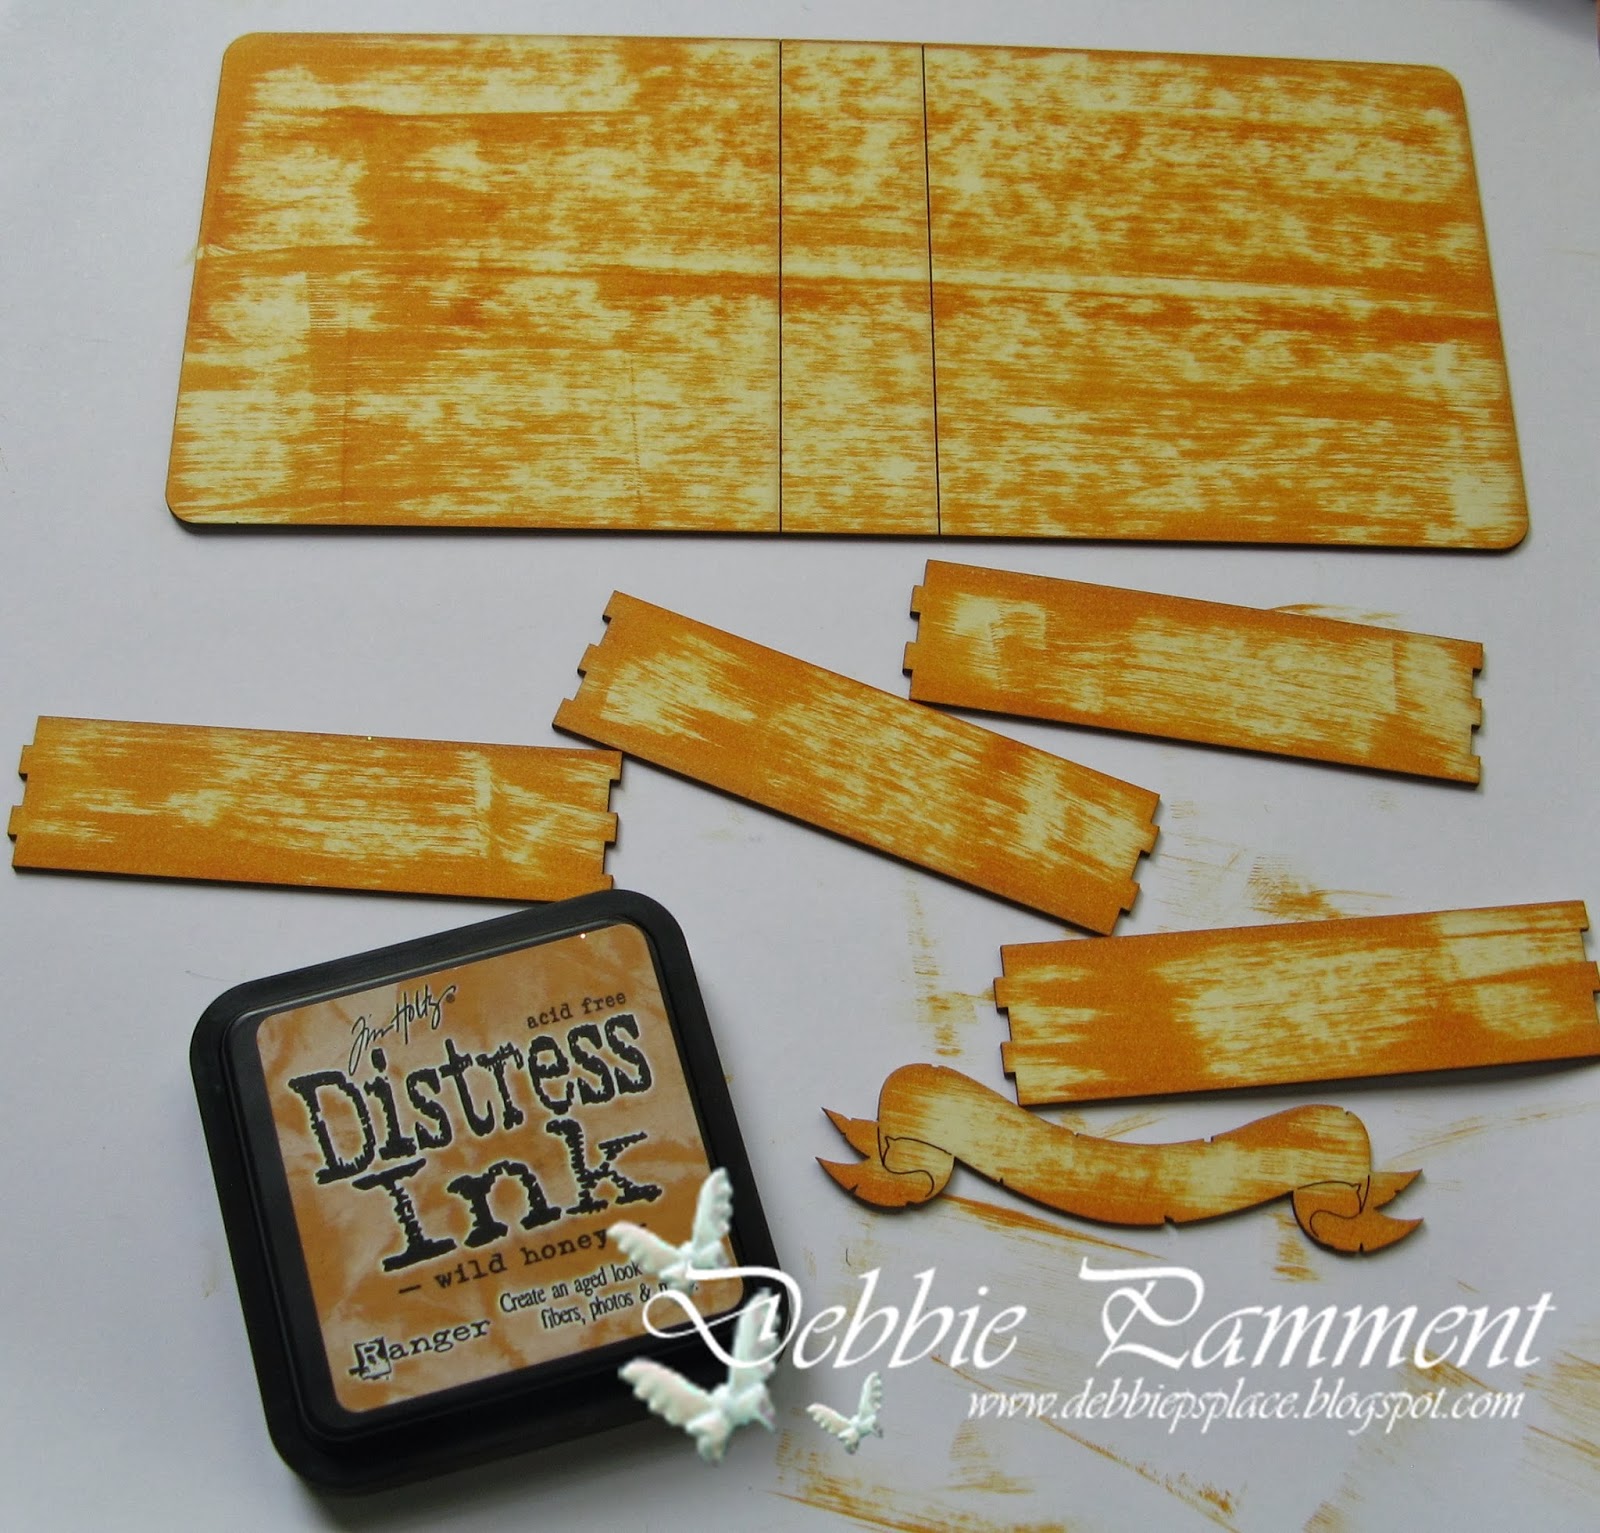

Distress Ink: 
Spun Sugar Distress Ink by Ranger


Sandie
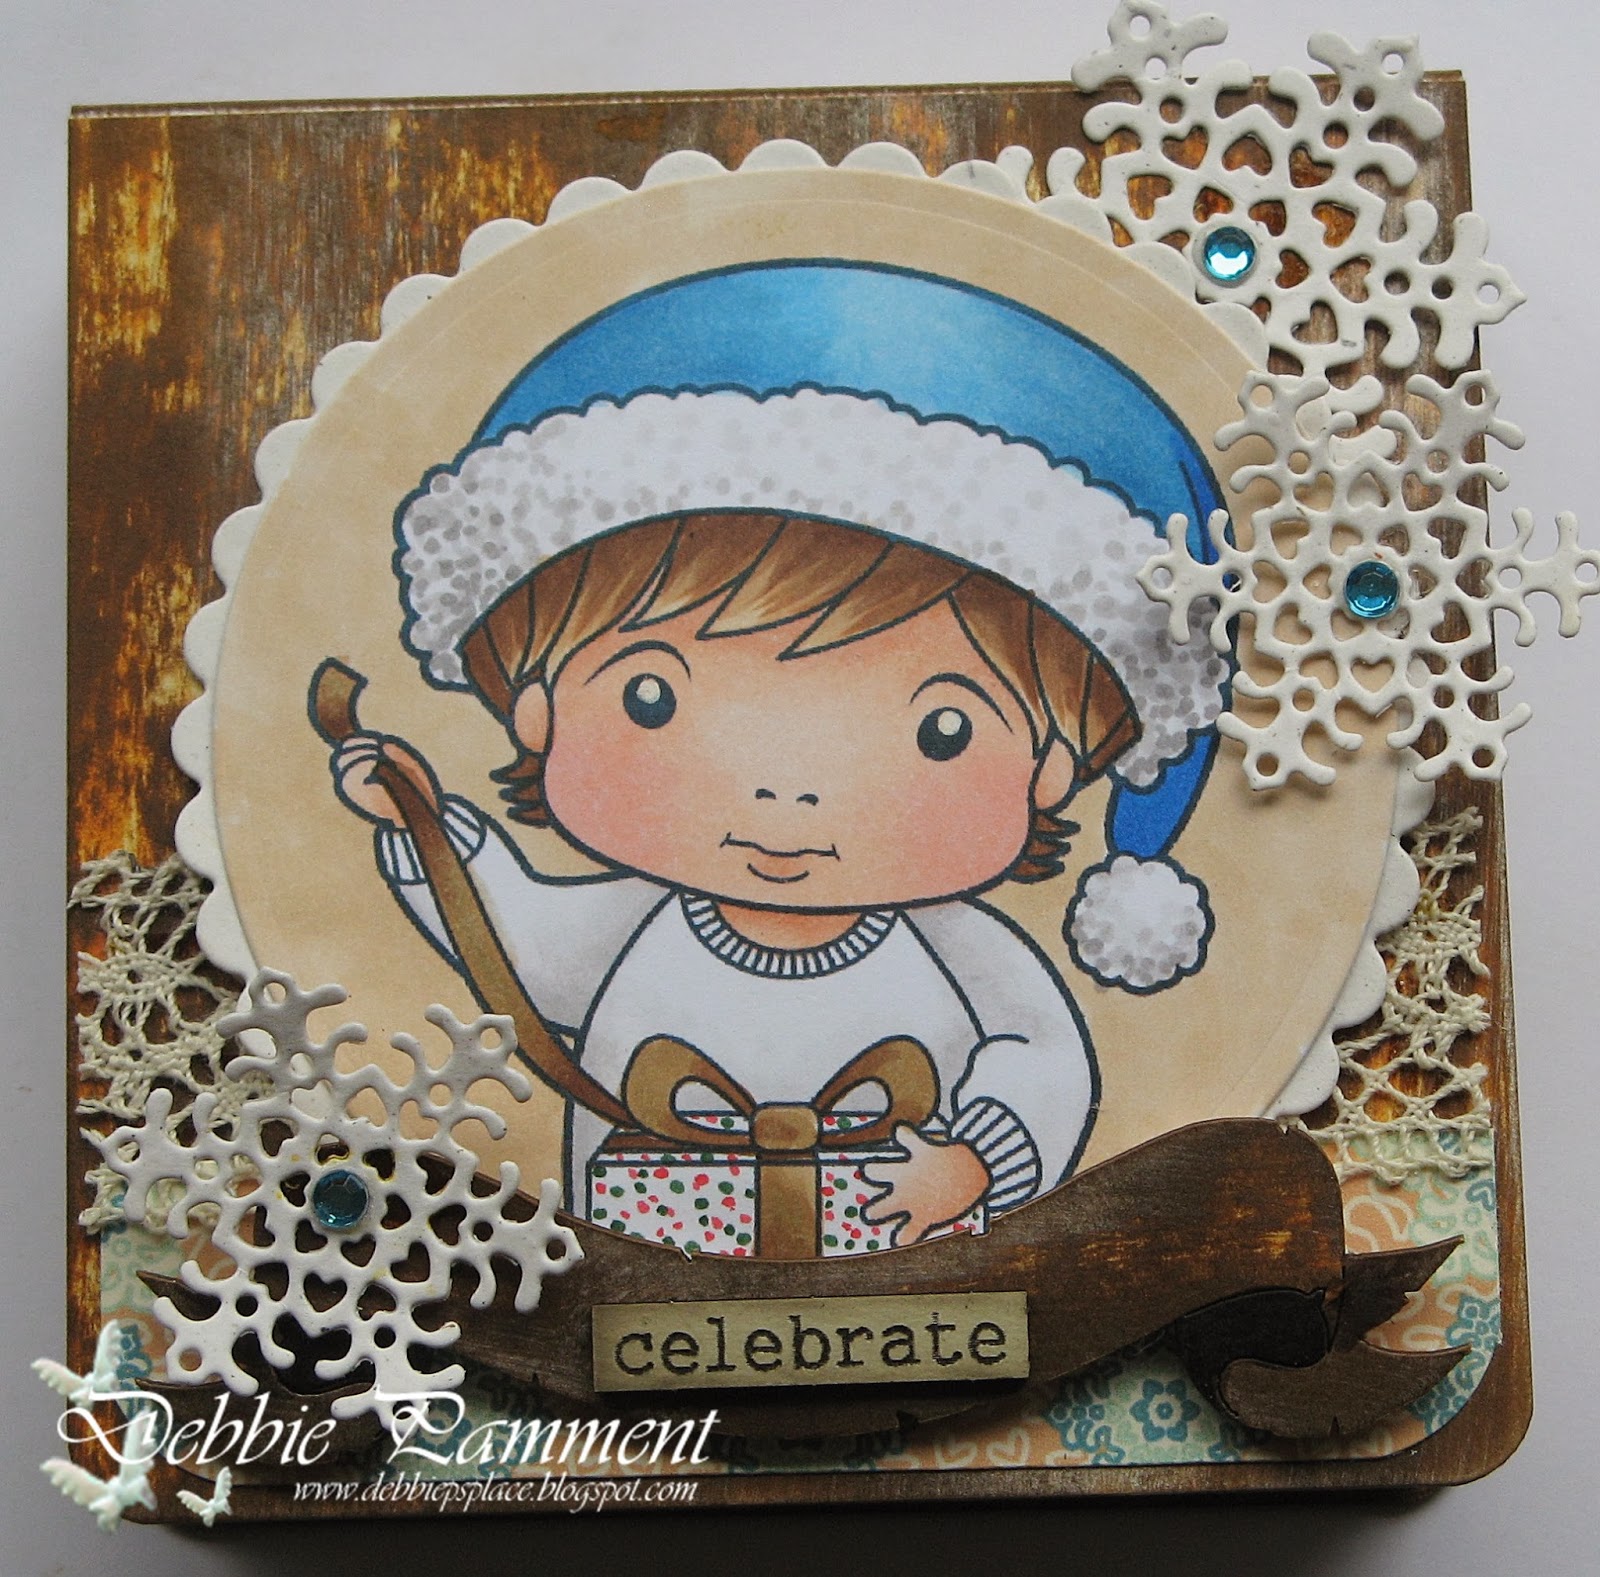
Stamp: Christmas Elf Marci
Dies: Heart Snowflake, Open Leaf Flourish, Book Tabs & Labels & Stitched Tabs
Copic Markers:
Skin - E000, E00, E11, R20
Clothes - R81, R83, R85. YG61, YG63, R24, R29
Candy Cane - RV10, RV11, RV13


You can join in all the fun at La-La Land Crafts by adding your creations to our Facebook Page or Twitter

I hope you feel inspired to create something pink and "Christmassy"

Hugs,
Tracey XO

Thursday, November 28, 2013

TUTORIAL THURSDAY ~AIRBRUSHED BACKGROUND~


Hi there, it's Tracey here to share a tutorial I have made for you on how to
  AIRBRUSH A BACKGROUND using copic markers. Usually I like to airbrush clouds, but today I will show you how I airbrush a snowy background for Christmas.

STEP 1
Stamp your chosen stamp onto card stock twice. One image will be used for colouring, the other to make a mask.


STEP 2
Color in one image. Then cut out the other image making sure to cut right on the outline so the background reaches all the way to the edge of the image, without an unsightly white border.
I like to use cutter bee scissors for this.


STEP 3
Use a rectangular die to cut out your coloured image. Unfortunately I forgot to photograph this step, so I have restamped him just for the purposes of this tutorial.
Once cut out, leave the image within the die as I use the die as a stencil to give the white edge to the rectangle during airbrushing.


STEP 4
Put your coloured image aside and prepare your masks for airbrushing.
I cut snowflakes using the Heart snowflake dies. I cut them from "mask-it", which is lightly adhesive.


STEP 5
You now have your reusable snowflake masks and Luka mask ready to start.


STEP 6 
Set up your airbrush with desired colour of copic sketch marker. I used BG000, BG72, and B60.
Adhere the card stock Luka mask on top of the coloured Luka image using repositionable tape runner adhesive.
Adhere the snowflake masks randomly over the background.


STEP 7
Use the airbrush to layer the 3 different colours over the entire area, putting more of each colour in some places. This is the first layer.


STEP 8
Carefully remove just the snowflake masks and reposition them somewhere different on the background.
Then repeat the airbrushing process with all three colours, but this time try to avoid parts of the snowflakes that you have already airbrushed, so that they stay crisp white.
This adds an extra layer of depth to the background.


STEP 9
Very carefully remove the masks, revealing your background.


STEP 10
Add some snow in by hand with copic markers to ground the image.
I used W0, W2, and W4.
Add embellishments and your Christmas card is finished.


STAMP

DIES

FRAMES AND SHAPES

COPICS
Skin- E000, E00, E21, E11, R30
Hair- E15, E18, YR21
Hat- E30, E31, E33, E35
Jacket- E11, E13, E15, E19
Collar- W2, W4, E31
Trousers- YG91, YG93, YG95, YG97, YG99
Top- R22, R24, R27, R29
Book- E30, E31, E33
Pages- W0, W2
Wreath- G20, G24, G28, G29, R27.

Congratulations for making it all the way to the end of my long tutorial. I hope you were inspired to try my background technique.
Don't despair if you don't have an airbrush. The same effect can also be achieved with masks used with distress inks and a foam brush.

Thanks again for allowing me to share my tutorial with you.

Hugs,

Tracey XO

Monday, November 25, 2013

Inspiration Monday: Pink Christmas


Hi everyone. It's Alyce here to bring you this weeks inspiration our theme is 

Pink Christmas

so here is what the Team Monday girls have to show you 


copics
skin E000 E00 E11 E02
hair E51 E51 E53 E55
dress R81 R83 R85

Copics Used
Skin- E50 E51 E11
cheeks R20 R00
Hair E30 E31 E33
Dress Boots Hat R00 R20 R30 R32 R35
Lantern C1 C3 C5 Y21 Y17

Alyce Keegan 
Stamp: Christmas Lantern Marci 


Copics:
Skin: E000, E00, E21, E11, E04, R20
Hair: E35, E57, E59, E49...
Outfit: Pink R00, RV11, R83, E04 Purple BV20, BV23, BV25, BV29
House: E40, E41, E43, E44, E47
Roof: E11, E13, E15, E18
Grass: YG03, G21, G94, G99
Flowers: Y35, Y38, E15, E18
Sky: B91, B93, B95, B97, B99, Molotow marker for stars
Lantern and glow: Y00, Y11, Y35


COPICS:
Outfit: E79, 77, 74, 71, E40, RV99, 95, 93, 91, 00, 0000
Wings: C5, 3, 1, 00, B0000; W3, 1, 00
Banner: C5, 3, 1, 00; B000, 0000
Lyre, Horn: E59, 39, 37, 35, 31, 30
Hair: E49, 29, 25, 53, 51
Skin: E13, 11, 01, 000, 0000; R22, 20

Debbie P
Stamps: Christmas Elf Marci
Dies: Christmas TreeHolly FlourishLarge Heart SnowflakePretty Poinsettia

Copics Used
Skin - E11, E00, E000, R24, R20, R11
Hair - E49, E44, E42, E40
Clothes - R85, R83, R81, RV10, YG01, YG0000
Holly and Berries - YG67, YG45, YG05, R39, R35, R32
Candy Cane - T2, T0, R39, R35, R32


You can join in all the fun here at La-La Land Crafts by adding your creations to our Facebook Page or Twitter

Thanks for swinging by and have a great weekend.

Friday, November 22, 2013

Inspiration Friday ~ Flags or Banner

Happy Friday! It is Jeanette here and it is my turn to share the lovely makes of the Friday team. Our inspiration this week is:
Flags or Banner

Here is what our wonderful team made:

Dies: Grass Border, Heart Banner, Cloud sun island
Copics
Skin:E000, E00, E21, E11, R30
Hair:E21, E25, E29, YR23
Top:YR30, Y21, YR23, YR24, YR27
R00, R30, R32, R35, R37, R39
W00, W2, W4, W7, W10
Frame:W00, W2, W4, W7, W10
YR23, Y21
Copics
skin - E000, E00, E11, E21, R30, R11, E04
Hair - E41, E42, E43, E44
Reds - R17, R27, R46, R59,
Golds - Y21, YR21, Y26
Lantern - W0, W1, W3, W5
Y21, Y26, Y28
Dies: Heart Banner, Street Lamp, Heart Fence, Stitched Scallop, Heart Snowflakes

Copics and Prisma Pencils
Skin ~ E000,E00,E21,R11 & R20
Hair ~ E70, E71, E74 & Black Prisma Pencil
Coat, Hat & Boots ~ E50, E51, E53, E40 & Light Umber Prisma Pencil
Dress, Ribbon & Lantern ~ B21, B23, Y21, Y23, Y17 & Crimson Red & Indigo Blue Prisma Pencils
Dies: Decorative Corner, Heart Snowflakes, Heart Banner


Sandie
Stamp: Christmas Elf Luka
Dies: Pretty Poinsettia
Christmas Frames and Shapes Kit
Copic Markers
Skin - E000, E00, E11, R20
Clothes - B91, B93, B95, B97. E42, E43, E44. Star Dust Stickles
Gifts - B12, B14, B18. Y13, Y15, Y18. R24, R43, R46. G20, G21, G24. Y21, Y26, Y28

You can join in all the fun here at La-La Land Crafts by adding your creations to our Facebook Page or Twitter
Thanks for swinging by and have a great weekend.
Hugs Jeanette xxo

Thursday, November 21, 2013

Tutorial Thursday - Faux Wood


Hi all - Debbie here with you today to show you how to create a "faux wood" look. I was asked to do this after I put my La-La Land Sketch Copic Marker Stand together using this method. It took me a little longer to do than I had hoped due to having to work out the colours using currently available ink pads - some of the ones I used  on my copic stand have been discontinued.


Apologizes for all of the photos - I have cut them back to as few as possible but I thought it would be good to show you how it all progresses.


The first thing you need to do is to collect your bits and pieces. Today I'm using one of the La-La Land Trinket Boxes. The inks I'm using are Distress Inks in Wild Honey, Gathered Twigs and Vintage Photo. You'll also need a white ink pad. I usually use my Stampin' Up one but it seems to have gone missing in my craftroom so I grabbed my Brilliance Moonlight White dew drop instead.


Grab the Wild Honey and drag it across the surface of the trinket box.


Follow up with Gathered Twigs......


....and then Vintage Photo.


The white goes on next - but drag it in selected areas rather than all over the surface. White ink usually stays wet longer so step away for about 10 minutes and let everything dry.


Once everything is dry re-layer on the Wild Honey and Gathered Twig until you are happy with the result. Add Vintage Photo sparingly at this stage if desired. 


And here's the trinket box decorated up using a digi paper from La-La Land's Retro Christmas set (the whole inside of the trinket box has been lined with this paper too), Christmas Present Luka and Heart Snowflakes.

I hope this inspires you to give this technique a go yourself - it looks great done on paper and used as a background too.

Debbie 
xXx

Monday, November 18, 2013

Inspiration Monday - Flags or Banners


Hi everyone sara here to bring you this weeks inspiration our theme is 

Flags Or Banners

so here is what the team Monday girls have to show you 


copics
Skin- E000, E00, E11, R30. Hair- E40, E42, E43, E44. 
Clothes- YG00, YG03, YG06, YR00, YR02, YR04, Y11, Y15, Y17.


copics
Skin - E11, E00, E000, R24, R20, R11
Hair - BV29, BV25, BV23, BV31, C10


copics
Skin E50 E51 E11 E13 
Cheeks R00 R20
Skirt stick gloves E55 E57 E59
Hat Corset Boots E01 E11 E13 E15 E25 E27 E29
Hair YR1 YR16 YR18 R24


copics
Outfit:
B99, 97, 95, 93, 91, 23, 21, 60
E47, 44, 43, 41, 40
Shoes: E29, 27, 25, 23, 21
Hair: E29, 18, 15, 13, 11
Skin: E13, 11, 01, 000, 0000; R22, 20
Candy cone: B99, 95, 93, 91; C5, 3, 1, 00

copics
skin - E000 E00 E11 E02
hair- E50 E51 E53 E55
dress- R35 R46 R59

Alyce
Stamp - Princess Marci
Dies - Heart Banner Die
 
Copics:
Skin: E000, E00, E21, E11, E04, R20
Hair: Y21, YR23, E15, E18
Dress: BV20, BV23, BV25, BV29
Grass: YG03, G21, G94, G99
Castle: W3, W5, W7
Roof: E11, E13, E15, E18
Rocks: E40, E41, E43, E44, E47
Sky: B00, B000


Don't forget, you can join in on all the La-La Land Crafts fun over on our Facebook Page, where you can also post your own La-la Land Crafts creations. You can also find us on Twitter

hugs sara x x 


Friday, November 15, 2013

Inspiration Friday - About a Boy


Good morning! It's Sandie here with this weeks inspiration Friday - 

About a Boy

If you haven't checked out Team Monday's creations, just click HERE or keep scrolling down.

Now let's see what Team Friday came up with..

Copics & Prisma Pencils
Skin ~ E000, E00,E21, R11 & R20.
Hair ~ E11, E13 & E15.
Jacket & Hat ~ E50, E51, E53, E40, E41, E13, E15 & Light & Dark Umber Prisma Pencils.
T/Shirt ~ YG91, YG93, YG95 & Black Prisma Pencil.
Scarf ~ E07, R24, R27 & Black Prisma Pencil.


Copic Markers:
Skin: E000, E00, E01, E11, R20
Hair: E31, E33, E35
Purple: V20, V22, V25
Green: G21, G24, G28


Copic Markers:
Skin, E000, E00, E11, E21, R30, R11
Hair - E50, E51, E53, E55, E57
Hat - E30,E31, E33, E34, E35
Trousers/ scarf - YG91, G94, YG63
Jumper - E41, E42, E43
Jacket - E70, E71, E74
Shoes - E41, E42, E43, E44, E70, E71, E74
Letter - W0, W1, W3, R17, R27, R46


Copic Markers
Skin: E000, E00, E21, E11, R30
Hair: E21, E25, E29
Bath: W00, W2, W4, W6
Claws: Y21, YR23, YR24, W4, B39
Bubbles: BG000, BG0000, BG72
Boat & accessories: E21, E25, E29, B32, B34, B37, B39. G40, G43, G46
Ground: W2


Sue 
Copics:
Skin: E000, E00, E11, R01, R02, B60
Hair: E41, E42, E43, E51
Greens: G21, G24, G28, YG63, YG67
Yellows: Y13, Y15, Y17, Y35, Y38
Blues: B91, B93, B95, B97, B99
Greys: W00, W1, W3

You can join in on all the La-La Land Crafts fun over on our Facebook Page, where you can also post your own La-la Land Crafts creations and get all the latest news. You can also find us on Twitter!

Have a great week,
Sandie & Team Friday
xxx