Showing posts with label Booktab & Labels. Show all posts

Friday, December 11, 2015

Inspiration Friday - Color Inspiration


Hello dear friends!

It's Alexandra here with the Team Friday and 'Color Inspiration'


Distress markers:
skin: vintage photo
cheeks: worn lipstick
hat: peeled paint, black soot
outfit: peeled paint, black soot
fur: pumice stone
gift: scattered straw, fired brick


Copics used: 
Skin (E000-00-21-11-13-04, R20)
Clothing (W1-3-5-7-9, Y21-23-26-28, YG91-93-95-97-99, 
R35-46-59-89, BV20-23-25-29, C1-3)


Star border from january kit club, Santa sleigh

Copics:
Skin : E13, 11, 21, 00, 000, R20, 00
Hair : E59, 57, 55
Clothes : R39, 46, 29, 27, 24, E47, 44, 43, 100, C8, C3, 2, 1, 0, G46, 24, 43


Pretty Poinsetia, Club La La land 'Celebrate'


Copics:
Skin: E04, E11, E00, E000, E0000
Hair: E43, E44, E47
Bell: E15, Y38, Y35, Y15
Outfit: R39, R37, R35, R32, R30
YG99, G97, G95, G93
E57, E55, E53, E51
T6, T3, T0 + W00


Numbers (May 2015 Club Kit), Nested Trees Die (November 2015 Club Kit)


Colour pencils:
Skin: Prisma Premier PC939, Derwent Coloursoft C130;
Hair: Prisma Premier PC 1093, PC1081;
Outfit: Prisma Premier PC1031, PC1076, PC1056.


Remember you can play along and join all the La La Land Crafts fun over on our Facebook Page, where you can post all your La-La Land creations, remember you can also find us over on Twitter and our Pinterest boards. 


Have a great week, see you next week!


Alexandra and the Team Friday

Thursday, October 8, 2015

Tutorial Thursday - Easle Box Card

Hi  its Jennifer here I hope you have all had a great week and managed
 to get some crafting in. I have an Easle Card Box Tutorial for you today.


To make the box you need to cut two 18cm x 14cm and
score 2cm in from each end on both of them

Put strong tape on one end of each.

Join them together.

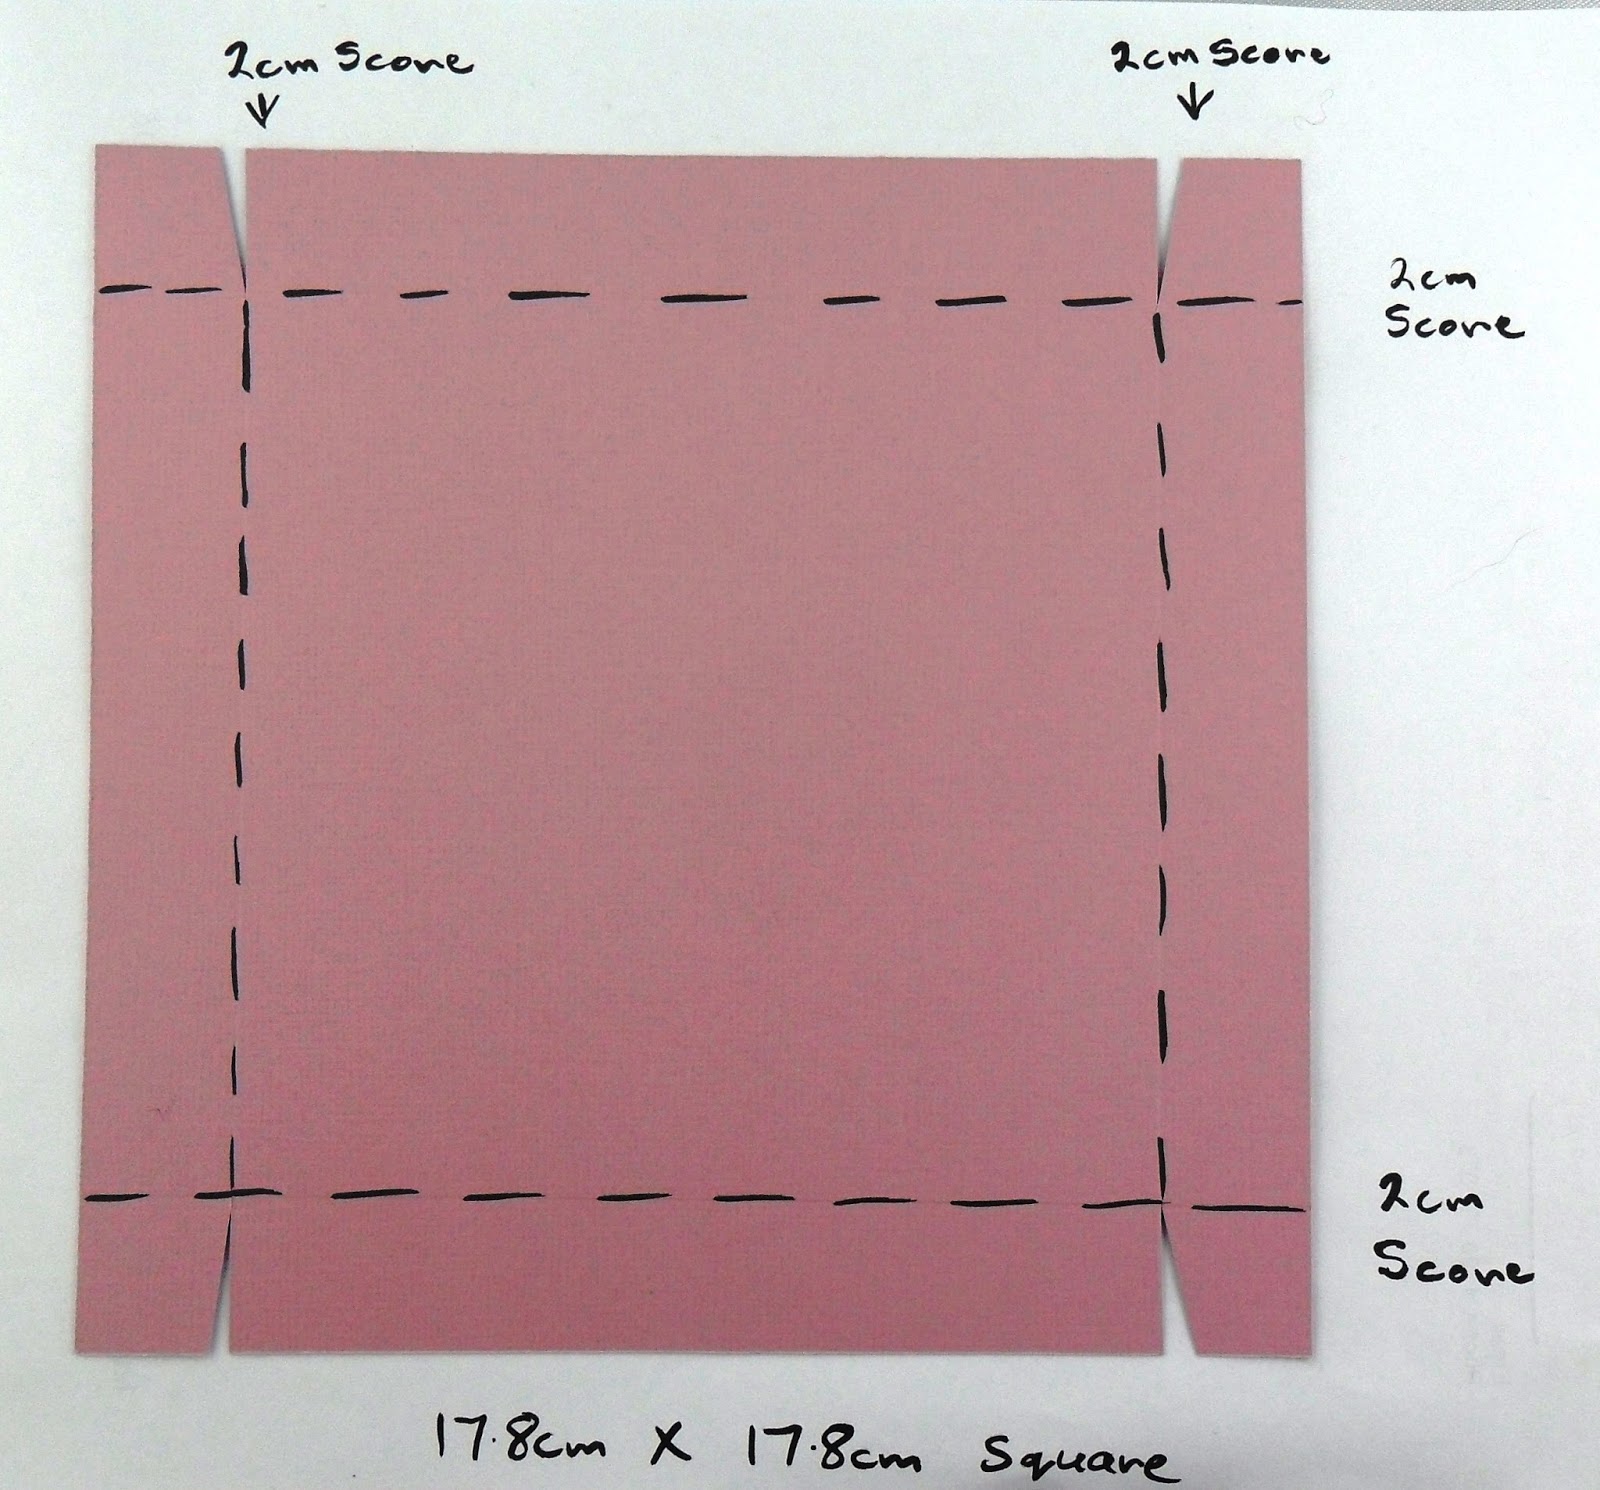
To make the box cut one 17.8cm x 17.8cm and score 2cm on each side.
Pop a small cut in each corner as in the picture.

Tape the corners.

Join the box together.

The box fits in the sleeve.

To make the Easle cut one 14cmx14cm.

Cut one 28cmx14cm and score at 7cm and 14cm.

Fold as in the picture.

Tape the Easle on the base.

Tape the Easle Card on to the Box Base.

Then decorate as desired. I cann't wait to see your creations.
 Also don't forget to join in all the La-La Land Crafts fun by adding
your creations to our Facebookpage and Twitter and for
more Inspiration we are now on Pinterest.

Wednesday, September 23, 2015

Inspiration Wednesday - Something for the Girls!


Hi there, friends! 

It's Arlene here and I'll be your Inspiration Wednesday hostess this week. ♥

We have an inspirational line-up of projects to share with you today featuring
La La Land Crafts dies!

This week's theme is:

Something for the Girls

So without further adieu, here are the projects from Team Wednesday that will be sure to ignite your creative engine!


12x12 Scrapbook page, featuring these dies:
Koi Circle die (Set of 3), Lattice Corner die, Lattice Border die, Berry Flourish die, Stitched Nested Circles (Set of 7), Fancy Butterfly die, Shabby Flourish die (April 2015 LLLC Club Kit), "Celebrate You" (May 2015 LLLC Club Kit)


Don't forget to join in the La La Land Crafts fun by adding your creations to our Facebook page!

For inspiration visit us on Pinterest and follow us on Twitter!

Have a fabulous day!

xoxo,

Arlene & Team Wednesday ♥

Wednesday, August 5, 2015

Inspiration Wednesday - A Sketch!


Hi! This week our Inspiration Wednesday theme is to use the following sketch

Let's see the creations the team have to share........


Anna
Dies:Stitched Elements (set of 7), Stitched Ribbon (Set of 3), Pretty Poinsettia, Christmas Tree,
Holly Flourish

Don't forget you can play along and join all the La La Land Crafts fun over on our Facebook Page, where you can post all your La-La Land creations. For more inspiration, you can find all of our Design Team projects over on our Pinterest boards. 

Have a great week, see you next week!
Team Wednesday

Thursday, May 28, 2015

Tutorial Thursday - Greeting Card and Holder Set


Supplies:
1 piece 5" x 12" white cardstock 
 4 pieces 6" x 4.75" white carstock
Patterned papers
Dies
Ribbon

Dies Used: 

Stamps:


How to:
1. Taking the 5" x 12" piece, score at 1.5, 1.75, 6.75 and 7"

Turn the card and score at 1.5". 

Score again at 1.25in, just between the 1.75 and 6.75 score lines. 

Turn the card so that the bottom (1.5in scoreline) is facing up to the numbers on the score board. Score at 4.75in and 10.75in, just up to the 1.5in score line. 

This is a close up of what it should look like at this point. 

Cut away the pieces marked below

This is what it should look like now

Taking the patterned papers, cover all the inside panels as desired. There is no need to cover the inside of the card pocket. 

Working on the outside, add the patterned paper to the front and the 1.5" flap. Don't cover the back yet. Turn the whole thing so that the 1.5in flap is on the right. (it will be upside down). 

Add a strip of double sided tape or ribbon glue about 0.75" from the right hand side of the back panel and secure the ribbon before adhering down the patterned paper. 

To complete the pocket inside, add some double sided tape, or wet glue to the outer tabs and fold under, adhering to the back panel. 
 

On the back of the paper pack I spotted this quote and decided to use it. I cut it out with a scissors, adhered it to a stitched oval and used it as my focal element on the front. 


I embellished the front with Cherry Blossom Flowers, Pretty Poinsettia leaves and Fancy Label(May Club Kit) Dies


To make the cards:
Fold the 6" x 4.75" card pieces in half to make 3" x 4.75" cards. Cut some patterned papers a little smaller than the card front and adhere down. Embellish the cards using various Dies, as desired.  


Sentiment is from Garden Marci rubber stamp


Finally, I added an Open Hearts Doily Border to the back. 

You can find all of our Tutorial Thursday projects over on our Pinterest Board. 


Sandie
xXx