Showing posts with label Valentine's Day. Show all posts

Thursday, January 27, 2022

Tutorial Thursday - Valentine Treat Holder


Hello everyone! Welcome to Tutorial Thursday!

SHERI here with you today to share a tutorial with you!

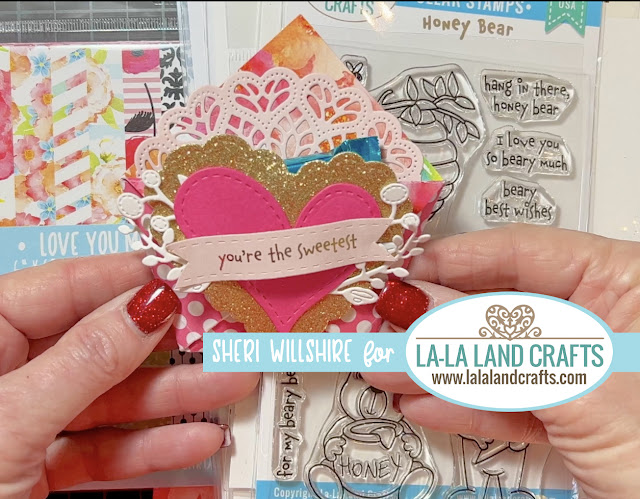
Today's tutorial is:  Valentine Treat Holder


PRODUCTS USED

PAPER CUTS & SCORING
(1) 6 x 6 Polka Dot Patterned Paper from Love You More Paper Pack
Fold in half diagonally
            
(1) 4 x4 Gold Glitter Cardstock
Cut large heart using the Scalloped Heart Die

(1) 6 x 6 Light Pink Cardstock
Cut (1) doily using the Mandala Doily Die
Cut 1 sentiment strip using the Horizontal Pocket Die

(1) 3 x3 Dark Pink Cardstock
Cut smaller heart using the Scalloped Heart Die

(1) 4 x 4 White Cardstock
Cut 4 sprigs using Shabby Flourishes Die and Stump with Twig* Die

~ now for the tutorial you have been waiting for ~ 


If you are unable to see the video tutorial above you can also see the video here
https://youtu.be/yKOAzHwFYE0

We hope that you are inspired to try out your own creation with the amazing stamps and dies from La-La Land Crafts! 

Make sure to join our LLLC FAN GROUP on Facebook for more ideas, 
inspiration and a general chit chat about our products!

Hoping you all have a great week of Creating

Sheri

Click on the buttons below to find us on these social media sites:


Thursday, January 20, 2022

Tutorial Thursday - Mailbox Treat Box


Hello everyone! Welcome to Tutorial Thursday!

Kristine here with you today to share a tutorial with you!

Today's tutorial is:  Mailbox Treat Box


When I was looking through my stash of LLLC dies and came across the fabulous Double Stitched Dome Die, I thought it was perfect for creating the front/back of a mailbox! So with Valentine's Day just around the corner, how cute would this be for stuffing some small valentines or candy in as a gift! So I created a template and am so giddy with the results that I just HAD to share it with you all... and it only takes 2 dies to make the base mailbox -- add more of your choice to decorate as you wish! 

PRODUCTS:
--main box--
Double Stitched Dome Die (largest die in this set)
Greys:  W2, 3, 5
Pinks:  R20, 21, 00, RV10
white gel pen ☺

OTHER SUPPLIES:
small brad
strong glue
ruler
paper trimmer
die-cut machine
hole punch or Crop-a-Dile (for brad)
*optional: small magnet
********KEEP SCROLLING FOR MY VIDEO TUTORIAL********


~ now for the tutorial you have been waiting for ~ 


CUTTING AND SCORING
  • (1) CUT a 5” x 3-1/2” (mailbox floor)
    • turn so the long side is at the top of your scoreboard SCORE 1/2” and 4-1/2” & burnish
    • Angle all tabs
  • (1) CUT a 8” x 4-1/2” (body of mailbox)
    • Turn so the long side is at the top and SCORE 1/2” and 7-1/2” & burnish
    • Then turn so the short side is at the top and SCORE 1/2” on just ONE of the long sides & burnish
    • Angle tabs. Then on the LONG score, make cuts up to the score line spacing them about 1/2” apart across the length of strip.
    • Cut off the 2 tabs on the ends and angle the rest of the small tabs.
  • (1) CUT a 7” x 3-1/2” (mailbox post)
    • Turn so the longest side is at the top and SCORE 3/4” and 6-1/4” & burnish
    • Turn so the shortest side is at top and SCORE 3/4”, 1-1/2”, 2-1/4”, 3” & burnish
    • CUT the 1/2” corner tab off each end.
  • (1) CUT a 1-1/2" x 1/2” strip (pull tab for door)
    • score at 1/2"
  • (1) CUT a 3" x 3/8" strip (flag post)
  • (1) CUT a 7-1/2” x 4” (base stand)
    • Turn so longest side is at the top and SCORE at 1/2”, 3-1/2”, 4”, 7” & burnish
    • Turn so shortest side is at the top and SCORE at 1/2” and 3-1/2” & burnish
    • Cut out corners from just ONE short end.
    • Find the middle of the 3” square (between the score lines) of the side that you cut the corners out of and place a mark.
    • DIE-CUT a square using the smallest die in the Double Stitched Squares Die set, centering the die so your center mark is in the middle.
  • (2) DIE-CUT domes using the middle-sized Double Stitched Dome Die (door and back)
  • (1) DIE-CUT a rectangle using the smallest in the Double Stitched Rectangles Die set (flag)
♥ ♥ ♥

We hope that you are inspired to try out your own creation with the amazing stamps and dies from La-La Land Crafts! 
Make sure to join our LLLC FAN GROUP on Facebook for more ideas, 
inspiration and a general chit chat about our products!

Hoping you all have a great week of Creating

KRISTINE ☺ 

Click on the buttons below to find us on these social media sites:


Wednesday, January 30, 2019

La-La Land Crafts February 2019 Release Showcase


Hello Everyone!
We are beyond Excited to share with you our NEW

We are releasing some Fantastic NEW Rubber and Clear Stamps, Dies, 
a Background Stamp Set and a Layering Stencil Set from our Love Box!


HERE IS WHAT IS INCLUDED IN OUR FEBRUARY 2019 RELEASE:

Clear Stamps:

Background Stamp:

Rubber Cling Stamps:

Stencil:

Dies:

...and here are the Gorgeous projects we created for you as inspiration using this RELEASE!

Card by: MARTHA
See Martha's Blog for more info


Products:


Card by: MARTHA
See Martha's Blog for more info
Products


Tag by: MINDY
See Mindy's Blog for more info

Products:


Mini Album by: MINDY
See Mindy's Blog for more info


Products:

Thank you for stopping by today! We hope that we have inspired you to try out your own creations using this Amazing Release!
Are you ready to SHOP?

Hugs
Mindy

Click on the buttons below to find us on these social media sites:

Thursday, February 1, 2018

Pop-up Valentine's Card Tutorial


Hello everyone!
Henryka here today with a Pop-up Valentine's Card Tutorial.
I will show you how to step by step make a Valentine's Card 
for someone special to your heart.


We are going to use papers, shapes and sentiments from December 2017 Card Kit.
You can buy it now for just 36.50$!!!

First, you need cut a card 20 by 15 cm.
You score it on longer side halfway through the page.


 Fold your card in half.


On the bending side of the card, you measure distances as in the picture.


Make cuts as in the picture.


Now you need to make score lines. See picture below.


This is how the centre will look when folded in half.


Put the card back in half and measure distances as in the picture.


Make cuts as in the picture.


Make score lines.


View of the inside of the card.


Put the card back again in half and measure distances as in the picture.


Make cuts as in the picture.


Make score lines.


The final view of the centre of our card.


Now, you need a base for your card. From white paper cut a piece of 15.5 by 20.5 cm.
Score in halfway through the page.


You need to attach your inside of the card to the white base. You can do it with a glue or double-sided adhesive tape. It's up to you :) 


The inside of our card is ready and we can start the nicest part - decorations. 


I have used shapes and sentiments from December 2017 Card Kit.
You can, of course, use anything, cut out elements with metal dies, coloured images etc.


I have attached all my elements with glue like that to keep a 3D effect of my pop-up card.


Here is a front of my card. Decorated with papers and sentiments from December 2017 Card Kit.


That's all! Our Pop-up Valentine's Card is ready!


Hope you will try to make your own Valentine's Card!
Thank you for your visit!
Have a lovely day!

Click on the buttons below to find us on these social media sites: