Showing posts with label DT Tamara. Show all posts

Thursday, November 24, 2022

Tutorial Thursday - Distress ink colouring (skin and hair)


Hello everyone! Welcome to Tutorial Thursday!

Tamara here with you today to share a tutorial with you!

Today's tutorial is:  Distress ink colouring skin and hair

Today I'll show you how I colour skin and hair of my la-la land crafts images.


PRODUCTS USED

DISTRESS INKS
skin: vintage photo
hair: antique linen, walnut stain
~ now for the tutorial you have been waiting for ~ 


We hope that you are inspired to try out your own creation with the amazing stamps and dies from La-La Land Crafts! 

Make sure to join our LLLC FAN GROUP on Facebook for more ideas, 
inspiration and a general chit chat about our products!

Hoping you all have a great week of Creating

Tamara

Click on the buttons below to find us on these social media sites:


Thursday, August 11, 2022

Tutorial Thursday - Decorating the inside of your card


Hello everyone! Welcome to Tutorial Thursday!
 
Tamara here with you today to share a tutorial with you!
 
Today's tutorial is:  DECORATING THE INSIDE OF YOUR CARD
 
Today I'll show you a simple way how to decorate the inside of your cards using our word dies with a pop up effect.
 
PRODUCTS:
 
~ now for the TUTORIAL you have been waiting for ~ 
 
 
Step 1 
Cut two rectangles. One is the base of your card (white cardstock) and the other one is for the inside of your card. White rectangle: 5 1/8" x 10 1/8" Yellow rectangle: 5" x 10" 


Step 2 
Make a fold in the middle of both rectangles.
 
 
Step 3 
Draw a line 0.5" from both (longer) sides.
 
 
Make marks 1.5" on both sides from the middle. Draw line.
 
 
You get a rectangle with a fold in the middle. Now fold the rectangle.


Step 4.
Take your scissors and cut from the middle fold to the 1.5" line on both sides.


Step 5
Take your scoring board and make score lines BUT only from 0.5" line on one side to 0.5 line on the orher side.
 
 
Make folds acording to picture. The middle part should be folded outside (towards you).
 
 
Step 6
The 1.5" line and fold was chosen because the "Enjoy die" fits perfectly inside it. If you're using other size dies you have to measure it first and make folds acordingly.
Place your die one the bottom part (from the middle) and run it through your die cutting machine.


Step 7
If you're using letters that have inner parts like "e" and "o" in my case, you can simply add some acetate behind it and glue the inner part on.


That's it. Don't forget that la-la land crafts has a lot of different word dies and also different letters so you can make your own words and use them inside your cards.
 
 
We hope that you are inspired to try out your own creation with the amazing stamps and dies from La-La Land Crafts!
Make sure to join our LLLC FAN GROUP on Facebook for more ideas, 
inspiration and a general chit chat about our products!
Hoping you all have a great week of Creating
Tamara
Click on the buttons below to find us on these social media sites:


Thursday, February 10, 2022

Tutorial Thursday - Background


Hello everyone! Welcome to Tutorial Thursday!

Tamara here with you today to share a tutorial with you!

Today's tutorial is:  BACKGROUND

Today I'll show you how to make a quick background for your Valentine's Day cards.


PRODUCTS USED
Picked raspberry

~ now for the tutorial you have been waiting for ~ 


Step 1:
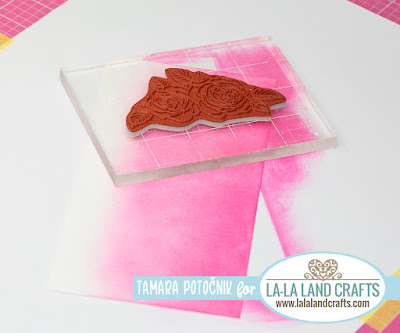
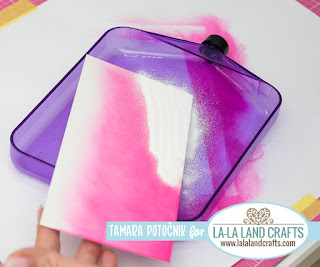
Cut white cardstock size 8" x 3.5". Take Picked Raspberry Distress Oxide and with blending tool start slowly applying colour from one (long) side to another. Leave some white space on the top. Dry the colour using heat gun. Take your powder tool and go over the whole card a few times. This is very important. You don't want your embossing powder all over the card.


Step 2:
Take roses stamp from Your Kindness Background stamp set and clear embossing ink pad (any kind). Stamp your image to the right bottom corner of the pink area. We will only stamp on the bottom of the card. Cover the stamped image with white embossing powder.


Step 3:
Repeat the proces again. This time rotate the stamp the way that it will align with the first image. Cover it with embossing powder and continue to the left side.


Step 4:
Heat emboss the stamped images. Make sure all the powder has melted.


Step 5:
Decorate the card using images from the wide range of la-la land crafts clear or rubber stamps. I used cute piggies from Happy Mail set. I coloured them with Distress Ink pads and fussy cut. I also used sentiments from the same set and just hand drawn a few lines around them.


... and here's my finished card. I hope you like my idea for a quick Valentine's Day card.
 

We hope that you are inspired to try out your own creation with the amazing stamps and dies from La-La Land Crafts! 

Make sure to join our LLLC FAN GROUP on Facebook for more ideas, 
inspiration and a general chit chat about our products!

Hoping you all have a great week of Creating

Tamara

Click on the buttons below to find us on these social media sites: