Showing posts with label Pumpkins. Show all posts

Friday, October 19, 2018

Inspiration Friday -. In the Pumpkin Patch


Hello everyone!
Lisabeth is here today and it's time to take a look some fantastic projects our Team Friday has made for you all.

Our theme this week is
In the Pumpkin Patch

Here are the fabulous DT creations:


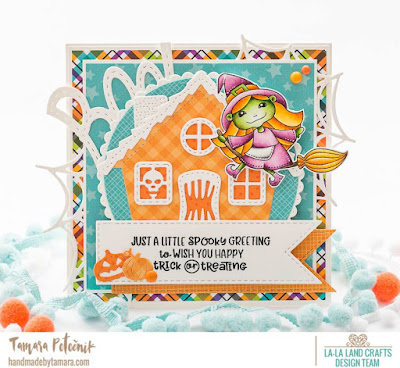
Card by: TAMARA
*See Tamara's blog for more information
Products:

Distress ink pads used:
skin: mowed lawn
hair, broom: fossilized amber, spiced marmelade
outfit: seedles preserves, black soot


Card by: TINA
* See Tina's blog for more information
Products:
Autumn Marci
Filigree Pumpkins
Postage Stamp
Flag Banner
Balloons
Two Leaves

Copic Markers used:
Skin: E04, E11, E00, E00, E000, E0000 Lips: R46, R24 Blush: R20, R30
Hair: E49, E29, E21
Jacket: YR09, YR04, YR15, E25 and Colorless Blender 
Skirt: B99, B97, B95, B93
Shirt: E31, E51, E50
Leggings: R46, YR09, YR04
Boots: E49, E29, E25, E33, E31
Pumpkins: R39, YR09, YR04, YR15


Card by: MAYRA
*See Mayra's blog for more information
Products:
Halloween Critters

Copic Markers used: 
Orange: YR27, YR09, YR16, YR12, Y08, Y32
Green: YG17, YG03, YG01, YG0000
Puppy: E40, W3, W00, R30
C9, W7, W5


Card by: MEG
*See Meg's blog for more information
Products:

Copics Markers used:
skin - E04, 13, 11, 21, 00, 000, 0000, R20
hair - E35, 33, 31
orange - YR07, 04, 21
brown - E44, 43, 41
green - YG67, G24, 21


Card by: CELINE

Skin : E13, 11, 21, 00, 000, R21, 20
Hai : E59, 57, 55, 53
Clothes and hat : 100, C8, 7, 6, BG49, 57, 45, 53, R85, 83, 81
Broom : E37, 35, YR23, Y15, 11


Card by: LISABETH
* See Lisabeth's blog for more information
Products:

Copic Markers used:
green: YG01, YG13, YG63, YG67
brown: E70, E71, E74, E77
orange: Y17, YR04, YR18, E08
skin: E000, E00, E02, E13, E15


That is all from the Friday team today. Have a super fun and creative weekend!

Hugs,

Lisabeth
and Team Friday

Click on the buttons below to find us on these social media sites:

Friday, September 5, 2014

Inspiration Friday - Sketch


Hi, it's Alina here today with our Inspiration Friday blog post. 
We have a sketch this week to inspire you:


And this is what our team has created: 


 Copic Markers:
Hair/Hat/Socks/Patches: V12, V15, V17
Skin: E00, E000, E21, E11, BV00, R20
Hat/Dress: W3, W5, W7, W9
Apron: YR21, YR23, YR24
Buckle (Hat): Y21, Y23, Y28
Cauldron: C3, C5, C7, C9
Stew: G82, G94, G99
Stick: E47, E51, E57
Cat: N3, N5, N7, N9; Cat ears: R11


Copic Markers:
Skin: E04, E11, E00, E000
Hair: 100, N9, N7, N5, N3
Outfit: W6, W5, W3, W1
R59, R39, R37, R35, R32, R22, R00


Copic Markers:
Skin- E000, E00, E21, E11, E04, R30
Shoes- W10, W8, W6, W4
RV13, RV14, RV25
Tights- BG11, BG23


Colour pencils:
Skin: Prisma Premier PC939, Derwent Coloursoft C130;
Hair: Prisma Premier PC1081, PC 935;
Outfit: Prisma Premier PC988, PC1072, PC935;
Flowers: Prisma Premier PC1017, PC927, PC988.


That's all from me today.
Remember, you can join in on all the La-La Land Crafts fun over on our Facebook Page, where you can also post your own La-la Land Crafts creations. You can also find us on Twitter! Enjoy crafting!

Have a lovely weekend!

Hugs,
Alina

Friday, October 25, 2013

Inspirational Friday ~ Halloween...

 
Hi all...Vicky here today to share will and the girls from Team Friday, some gorgeous creations with this Friday's theme..
 
Halloween...!


Copic Markers
Skin - E000, E00, E11, R20
Hair - YG21, YG23, YG25, G17, G40
Witch Hat/Dress/Shoes - W1 through W9
Cauldron - C5, C7, C9. R43, R46
Tights/Hat - V12, V15, V17
Apron - YR21, YR23, YR24, YR27
 
 
Dies ~ Pumpkins Die


Copics
Skin - E000, E00, E21, E11, R30, R11, E04
Orange - YR16, YR68, YR04, YR07
Browns - E70, E71, E74
Hair - W0, W1, W3, W5
 
 
Stamp ~ Dragon Luka
 
 
Copics
Skin - E000, E00, E21, E11,
Costume - V000, V01, V12, V15, V17, FV2
YG21, YG23, YG25, YG17
YR00, YR02, YR04, YR07, YR09
C03, C06, C10
Y13, Y19
Hair - Y21, YR23, E15
House and grass - YG25, YG17, V15, YR04, C10
 
 
Copics & Prisma Pencils
Skin ~ E000, E00, E21, R11 & R20.
Hair & Broom ~ E11, E13, E15, E19 & Tuscan Red Prisma Pencils.
Costume & Hat ~ E70, E71, E74, E77, YG61, G63, YG67 & Black & Dark Green Prisma Pencils.
Wand ~ Y17, Y19, C0, C00 & Dark Umber Prisma Pencil.
 
Don't forget, you can join in on all the  La-La Land Crafts fun over on our  Facebook Page, where you can also post your own La-la Land Crafts creations. You can also find us on Twitter!

Hope it inspires and have a crafty day!
 
biggest of crafty hugs Vicky and Team Friday..xx 


Thursday, October 24, 2013

Tutorial Thursday - 3D Pumpkins...


Hello SILVIE here with a fun Pumpkin tutorial to share. 
Those 3D pumpkins will be perfect for your Halloween projects as well as for festive Thanksgiving decorations. 

SUPPLIES:
White and green cardstock
Bone folder
Ranger Distress inks – Rusty Hinge and Vintage Photo
Ranger distressing tool (or sponge)
Adhesive
Tweezers
Die cutting machine

* STEP 1 *
Die cut several pumpkins and stems with vines with your LLLC pumpkin die. You can use as many die cuts as you want but to obtain a certain dimension, the minimum is 10. I’m using 20 pumpkins and 10 stems here. If you use a lightweight cardstock or patterned paper, you can cut 2 shapes at a time to go faster.

* STEP 2 *
Ink the edges of pumpkins with Ranger Distress Ink -  Rusty Hinge. Don't be afraid to go further with the ink towards the centre of the pumpkin.

* STEP 3 *
Fold each pumpkin in half, align the edges as precisely as possible and make sure they are even. Make crisp folds with your bone folder.

* STEP 4 *
Apply glue on one side of your folded pumpkin and adhere your next folded pumpkin to it. Make sure to line up the shapes along the straight edge where the fold is.

* STEP 5 *
Repeat the same and adhere all your folded pumpkins together. 

 *STEP 6 *
Ink the edges of the pumpkin with  Ranger Distress Ink -  Vintage Photo.

 *STEP 7 *
Glue stems with vines to your pumpkin. As those are really tiny, using a pair of tweezers makes it easier. It’s better to glue stems once the pumpkin is finished as you can decide where exactly you want to put them.

Stems with vines glued to the pumpkin:

* STEP 8 *
Your pumpkin is now finished.  You can glue the back of the pumpkin to your card by applying glue to both finished ends of the pumpkin.  Or you can make it a standing 3D object – in this case apply adhesive on both finished ends and bring them together.

I used those pumpkins to decorate my LLLC Trinket Box. The black Spiderweb corner die is by LLLC as well. 
I applied Stardust Stickles on the edges of the pumpkins for more sparkle :)

Below you can see my other two projects using the pumpkins in 2 different ways: 


 I hope you have enjoyed today's tutorial, and we look forward to seeing your creations
You can share them with us at  La-La Land Crafts by adding your creations to our Facebook Page or Twitter 

Thank you for stopping by!
have a lovely day
Silvie xx

Friday, September 20, 2013

Halloween New Release SHOWCASE Day Five

We are so glad you joined us for the last day of our SPOOKTACULAR week showcasing the NEW HALLOWEEN Stamps, Dies and Frames & Shapes!!

In this new release we have FOUR new stamps, THREE new dies and ONE new Frames & Shapes Kit

The new stamps include:

For the DIES we have:

Last, but not least, we have an awesome Halloween Frames & Shapes Kit!!


All of these NEW products are now available in our online store! Click HERE to go SHOPPING! :-)

Team Monday have showcased these new beauties from Monday–Wednesday, if you've missed their amazing designs be sure to scroll on down!! Today, Team Friday finish the showcase week with another recap of all the new products.

Let's take a look at what they've come up with.


Copics Markers
Face (Burlap Sack) - E55, E53, E51, E000
Skin (arms)- E11, E00, E000
Cheeks - YR27
Lips - R24, R20
Hair - E9, YR27, YR24, YR21
Straw - Y15
Clothes - E49, E44, E42, E40, E9, YR27, YR24, YR21, B95, B93, B91, YG67, YG63, YG61
Bird - YR16, T8, T6, T4, T2, T0


Sandie
Stamp: Scarecrow Marci
Dies: Pumpkins, Rolled Roses Small & Medium, Rolled Roses Large & Open Leaf Flourish
Halloween Frames and Shapes

Copic Markers:
Skin - E000, E00, E11, R20
Hair - E50, E53, E55
Clothing/Hat - YG91, YG93, YG95, YG97. E42, E43, E44. Y11, Y15. YR14, YR18.
Boots - E42, E43, E44, E47


Liz Marsden
Stamp: Cauldron witch Marci 
Spider web corner, Spider web Border & Pumpkins
Halloween Frames and Shapes

Copics
Skin - E000, E00, E21, E11, R30, R11
Hair - W0, W1, W3, W5
Ladle - E70, E71, E74
Outfit - purples - V15, V17, BV08
Greens YG11, YR04, YG23
Greys - C000, C0, C1, C3


Sue
Stamp: Darling Dragon Luka
Dies: Spiderweb Corner, Spiderweb border, Eerie Bats & Frightful Fence 
Halloween Frames and Shapes

Copics
Skin: E000, E00, E11, R01, R02
Hair: E23, E99, E37, E49
Greens: TG03, YG06, YG17, YG09
Blues: BG01, BG02, BG05, BG09
Grey: N0, N1, N3, N5, N7


Katie K
Stamp: Cauldron Witch Marci 
Dies: Spiderweb corner & Pumpkin 
Halloween Frames and Shapes Set 

Distress Inks used: Tatter Rose, Vintage Photo, Aged Mahogany, Concord, Rusty Hinges, Marigold, Black Soot.


Jeanette
Stamp: Bat Girl Marci
Dies: Spider Web Corner
Halloween Frames and Shapes Kit

Copic Markers:
Skin: E000, E00, E11, BV00, R20, R11
Hair: E50, E51, E53, E23
Black: C3, C5, C7, C9
Grey: C00, C1, C3
Purple: V00, V12, V15, V17


Amanda
Stamp: Batgirl Marci 
Dies: Spider web corner
Halloween frame and shape kit

Copics
Skin E000-00-11-13 BV00 R11-12
Hair V04-05-05 C5-7-9
Dress V01-04-05-06-09, N1-3-5-7-9


Vicky
Stamp: Darling Dragon Luka
Dies: Pumpkin & Spiderweb Border
Halloween Frames & Shapes Kit

Copics & Prisma Pencils
Skin ~ E000, E00, E21, R11 & R20.
Hair ~ E13, E15 & E19.
Costume ~ BV000, BV00, BV01, YR00, YR01, Y21, Y32, Y17 & Violet, Orange & Burnt Ochre Prisma Pencils.

I hope you have enjoyed the past five days of amazing inspiration from both of our teams. Don't forget, all of these NEW products are now available in our online store! Click HERE to go SHOPPING! :-)

Have a great day!
Team Friday
xXx