Showing posts with label Christmas Tree Die. Show all posts

Friday, September 11, 2015

Inspiration Friday - Decorate the Corners

Hello lovely people of La-La Land!!

Alexandra and Team Friday here to day to share with you some more inspiration for the "Decorate the Corners" theme of the current week.

Let's have a look:

Lattice Doily Border Die, Photo Elements Die Set (November club kit), Snowflake Banner Die


Copic Markers:
Skin (E000-00-21-11-13-04, R20)
Clothing and accessories 
(E53-55, 
BV000-01-02, 
C0-1-3-5, 
RV10-11-13-14, 
V20-22-25-29, 
Y21-23-26-28)

Dies: Lattice Corner Die , Stitched Elements, Photo Elements Die Set (November 2014 Kit), Numbers and Balloons (May 2015 Kit)
Colour pencils:
Skin: Prisma Premier PC939, Derwent Coloursoft C130;
Hair: Prisma Premier PC1093, PC1081;
Lollipop: Prisma Premier PC927, PC1030, PC912


Sue
StampHello Molli

Copic Markers:
Skin: E000, E00, E11, E21, R11, R20, R22
Hair: Y21, YR24, Y26, E25, E29
Oranges: YR00, YR02, YR65, YR68, YR09
Reds: R20, R32, R14, R35, R39
W3


Sandie
Stamp: Birthday Clown Luka
Dies: Scroll Corner, Koi Circle, Stitched Circles, Seaweed Set
Copic Markers: 
Skin - E000, E00, E11, R20, E04
Hair - E07, E09, E21
Blue - B21, B23, B24, B26
Yellow - Y11, Y13, Y15, Y18
Red - R22, R24, R27
Green - YG21, YG23, YG25

Don't forget you can play along and join all the La La Land Crafts fun over on our Facebook Page, where you can post all your La-La Land creations, remember you can also find us over on Twitter and our Pinterest boards

Happy Crafting to all of you,
Alexandra and the Team Friday girls

Friday, September 4, 2015

Inspiration Friday - Metal embellishments


Hi,

It's Tamara here today. Our theme this week is 

Metal embellishments

Here's what Team Friday made to inspire you.

Dies: Filigree Moon (from the January 2015 Club Kit), Love Owl Tag (from the December 2014 Club Kit), Open Leaf Flourish, Lanterns.
Copic Markers:
Skin: E04, E11, E00, E000, E0000
Hair: W7, W5, W3
Outfit: RV95, RV93, RV91, RV10, RV00
Y28, Y26, Y21, Y00


Copic Markers:
Skin (E000-00-21-11-13-04, R20)
Hair (E44-47-49)
Clothing and accessories (YG21-23-25, R20-22-24-27-29, B00-01-02, E74-77-79)


Distress markers and Spectrum aqua markers:
skin: vintage photo
cheeks: worn lipstick
hair: antique linen, walnut stain
hat, skirt, shoes: fired brick, black soot
October 2014 Club Kit - Branches

Copic Markers - 
Skin - E000, E00, E11, R20
Hair - E21, E23, E27, E29
Shirt - Y11, Y13, Y15, Y19
Pants - RV11, RV13, RV14
Shoes - B00, B12, B14, B16
Lollipop - B12, B14, B16. RV11, RV13, RV14. R43, R46


Sue
Stamp: Christmas Ornament Luka
Dies: Scroll Corner, Christmas Hill Border, Stitched Nested Circles

Copic Markers:
YG93, YG95, YG97
C00, C0, C1, C3, C5, C7, C9

Alina
Stamp: Kimono Marci with Lantern (with sentiments)


Colour pencils:
Skin: Prisma Premier PC939, Derwent Coloursoft C130;
Hair: Prisma Premier PC1093, PC1081.

That's all from me for today.

Don't forget you can play along and join all the La La Land Crafts fun over on our Facebook Page, where you can post all your La-La Land creations. For more inspiration you can find all of our Design Team creations on our Pinterest boards

Thank you again for stopping by and have FUN!
Hugs, t. 

Tuesday, December 17, 2013

Tutorial - Quick and Easy Elegant Christmas Cards

Irina is here with a Tutorial Thursday on Tuesday for you!

Christmas is around the corner and if you are still making your Christmas cards, you must be running out of time!  Today I would like to show you how to make four GORGEOUS cards in no time!!!

All these cards are made out of cream and metallic gold cardstock and feature dies from La-La Land Crafts.

Card 1
~ Snowflake ~
 1. Cut Cream cardstock for the card base at 5" x 10" and score it at 5".
2. Use Scor-pal to score a frame on 4 1/2" x 4 1/2" piece of Cream cardstock.
3. Glue above layer to 4 3/4" x 4 3/4" Gold cardstock.
4. Glue both layers to the card front.
5. Glue 4" paper doily to the center of the card front.
6. Glue together 2 3/4" x 2 3/4" Cream cardstock and 3" x 3" gold cardstock.
7. Use foam tape to attach the panel to the center of the card front.
8.  Use Scor-pal to score a frame on 2 1/4" x 2 1/4" piece of Cream cardstock.
9.  Glue above layer to 2 1/2" x 2 1/2" layer of Gold cardstock.
10. Use foam tape to attach this panel to the center of the card front.
11.  Cut 2 sets of snowflakes using Heart Snowflakes Die.  One set out of Cream cardstock and one out of Gold cardstock.
12. Using foam tape, layer small gold snowflake on the top of large white snowflake.  Then use foam tape to attach layered snowflake to the center of the card.
13.  Cut 4 3/4" x 4 3/4" Gold cardstock and 4 1/2" x 4 1/2" Cream cardstock for inside of the card.  Embellish inside of the card with remaining snowflakes.

Card 2
~ Poinsettias ~
 1. Cut Cream cardstock for the card base at 5 1/2" x 11" and score it at 5 1/2".
2. Use Scor-pal to score a frame on 5" x 5" piece of Cream cardstock.
3. Glue above layer to 5 1/4" x 5 1/4" Gold cardstock.
4. Glue both layers to the card front.
5. Glue together 4" x 4" Cream cardstock and 4 1/4" x 4 1/4" gold cardstock.
6. Use foam tape to attach this panel to the center of the card front.
7. Use Scor-pal to score a frame on 3 1/4" x 3 1/4" piece of Cream cardstock.
8.  Glue above layer to 3 1/2" x 3 1/2" layer of Gold cardstock.
9. Use foam tape to attach this panel to the center of the card front.
10.  Cut a flourish using Large Flourish Die. Glue the flourish to the left side of the front panel.
11. Stamp sentiment using Walnut Stain Distress Ink on Cream cardstock.  Cut with a circle die.  Cut Gold cardstock with the larger circle die.  Layer them together and use foam tape to attach to the center of the card.
12. Cut two sets of poinsettias from Cream cardstock using Pretty Poinsettia Die.  Use two larger and one medium sets of petals to create a larger flower.  Use one medium and two small sets of petals to create a smaller flower.
13. Cut centers of the flowers from Gold cardstock using the same Pretty Poinsettia Die.  Use foam tape to attach centers to the flowers.
14. Arrange poinsettias on the front of your card and use foam tape to attach them.
15.  Cut 5 1/4" x 5 1/4" Gold cardstock and 5" x 5" Cream cardstock for inside of the card.  Embellish inside of the card as desired.
 
Card 3
~ Winter Wishes ~

1. Cut Cream cardstock for the card base at 5 1/4" x 10 1/2" and score it at 5 1/4".
2. Cut 5" x 5" layer from Gold cardstock and 4 3/4" x 4 3/4" layer from cream cardstock.  Glue them together and then onto the front of the card.
3. Glue together 4" x 4" Cream cardstock and 4 1/4" x 4 1/4" gold cardstock.
4. Use foam tape to attach above panel to the center of the card front.
5. Cut 4 sets of corners using Decorative Corner Die set.  Use larger corners from the sets and glue them to the corners of the above panel.
6. Stamp Christmas Lantern Marci using Walnut Stain Distress Ink onto Cream cardstock.  Cut with a circle die.  Cut Gold cardstock with a larger circle die.  Layer them together.  Glue 5" paper doily to the bottom of the Gold cardstock.  Then use foam tape to attach these layers to the center of the card.
7. Stamp Winter Wishes sentiment (from Hot Cocoa Marci rubber stamp) using Walnut Stain Distress Ink onto a strip of Cream cardstock.  Glue sentiment to the bottom right side of the card.
8. Cut three roses using Rolled Rose Large Die and Rolled Rose Small & Medium Die set (one of each).  Use quilling tool to make the roses.  If you are not sure how it works, we have a youtube tutorial on how to make them.
9. Arrange roses in a cluster and glue them over the sentiment.
10. Cut a leaf using Open Leaf Flourish Die.  Cut the leafs apart, arrange them under the roses and glue down.
15.  Cut 5" x 5 " Gold cardstock and 4 3/4" x 4 3/4" Cream cardstock for inside of the card.  Embellish inside of the card using remaining corners.

Card 4
~ Christmas Tree ~

1. Cut Cream cardstock for the card base at 5 1/2" x 11" and score it at 5 1/2".
2. Cut 5" x 5" piece of Cream cardstock and 5 1/4" x 5 1/4" Gold cardstock.  Glue them together and then to the card front.
3. Glue together 4" x 4" Cream cardstock and 4 1/4" x 4 1/4" gold cardstock.
4. Use foam tape to attach above panel to the center of the card front.
5. Cut 8 sets of corners using Decorative Corner Die set.  Use 4 large corners from the sets and glue them to the corners of the above panel.
6. Glue together 3 1/4" x 3 1/4" Cream cardstock and 3 1/2" x 3 1/2" gold cardstock.
7. Use foam tape to attach above panel to the center of the card front.
8. Use 4 small corners from the corner sets and glue them to the corners of the above panel.
9. Cut two circles with circle dies, one from gold and another one from cream cardstock.  Glue circles together and use foam tape to attach them to the front of the card.
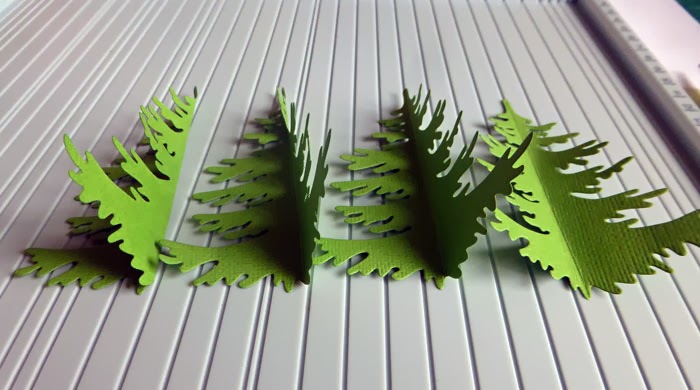
10.  Cut 3 Christmas Trees using Christmas Tree Die. Score trees in the center and glue them together on the fold lines.  We have a Tutorial here on how to make this type of 3D Christmas tree.
11. Cut gold star using Pretty Poinsettia DieUse foam tape to attach it to the top of Christmas Tree.
12. Glue Christmas Tree in the center of the circles.
13.  Cut 5 1/4" x 5 1/4" Gold cardstock and 5" x 5" Cream cardstock for inside of the card.  Embellish inside of the card with the remaining corners.

I hope you find these tutorials helpful in making your Christmas cards.  :-)

Hugs!

Friday, December 6, 2013

Inspirational Friday ~ Blue, Brown & White


Hi all....Vicky here today to share with and the girls from Team Friday, some gorgeous creations with this weeks Friday's theme..

Blue, Brown & White..!

and here are their beautiful projects to inspire you...


Copics

Skin: E0000, E00, E11, E13, R22, R20
Hair: E70, E71, E74, E79
Dress + Bows: B18, B16, B14, B12
Booties: E59, E57, E55, E53 + W5, W3, W1 + BG72, BG75
Snowflakes: C4, C2, B000S
Copics
Skin - E000, 00, 11,13,21, R30,11
Hair - E30. 33, 35
Outfit -B91, 93, 95, E40, 41, 42, 43, 44
Lantern - E70,71,74, Y21, YR21, 23
              Christmas Tree die
                Pretty Poinsettia die
                    Open Leaf Flourish die
                   Heart Doily Border die
Copics & Prisma Pencils

 Skin ~ E000, E00, E21, R11 & R20
Hair & Bauble ~ E70, E71, E74, E77, Y21, Y23, Y26 & Black Prisma Pencil
Dress, Shoes & Ribbon ~ B41, B45 & Indigo Blue Prisma Pencil
Cardigan & Leggings ~ E40, E41, E42 & Light Umber Prisma Pencil

Natasha

Stamp ~ Hot Cocoa Marci
Dies ~ Creepy Vines
                 Heart Banner die


Copics:

 Hair - E29, E25, E23, E21
Skin - E53, E51, E50, E93
Skirt (Browns) - E43, E42, E40, E40
Scarf - (Blues) - B24, B23, B21
Shoes - E35, E34, E33


Sue

Stamps~ Letters to Santa Luka, Snowflake Garland Marci (sentiment)
Dies~ Heart Snowflake,
Holly Flourish,
Stitched Scallops Border


Copics 
Skin - E000, E00, E11, R01, R02
Hair - E41, E43, E44, E47
Shirt - B0000, B000, B00, B02
Jacket - B93, B95, C00, C0, C1
Pants - E40, E41, E42 
Shoes/Scarf - B91, B93, B95, B97, B99
Antlers - W0, W1, W3


Tracey

Stamp~Christmas lantern Marci
Die~Holly flourish die


COPICS
Skin- E000, E00, E21, E11
Lips- R30, RV11
Hair- E21, E25, E29
Shoes- E21, E23, E25, E29, BG70
W2, W4, W6, W8
Lantern- W00, W2, W4, W6
Y31, Y21
Dress shading- E42
Jacket shading-BG72, B95, B97

Don't forget, you can join in on all the  La-La Land Crafts fun over on our  Facebook Page, where you can also post your own La-la Land Crafts creations. You can also find us on Twitter!

Hope it inspires and have a crafty day!

biggest of crafty hugs Vicky and Team Friday..xx 


Thursday, December 5, 2013

Tutorial Thursday- 3D Christmas Tree

~ 3D Christmas Trees ~ 

Hello, it is Sue here with today's Tutorial Thursday, sharing the 'how to' for the dimensional Christmas trees used in this wreath.
What a perfect time of year to make some quick and simple trees for your cards, gift bags and other creative creations!


Firstly, get your supplies together:
star from the Pretty Poinsettia Set
A good quality Glue
Scor-Pal
Stylus
Cardstock - Rouge and Moss


Step 2: 
 Cut 4 Christmas Trees and one red star- set the star aside, it comes into play right at the end


Step 3:
Score the through the centre of the tree carefully ensuring it is straight.


Step 4:
Score each of the trees in the same way.


Step 5:
Bend each tree at the score line, bending up between your fingers makes it really easy.


Step 6:
Leave the tree that will be on the bottom with a slight bend.


Step 7:
Run a thin line of strong adhesive down the score line of the bottom tree


Step 8:
Place the 2nd tree on top, add another line of adhesive down the score line.  Repeat this step until you have a stack of 4 trees.


Step 9:
Using your stylus, press firmly to ensure maximum adhesion. Allow to dry.


Step 10:
Squeeze the trees, ensuring they all pop up.


Step 11:
Attach the star, voila, you have a completed tree ready to attach to the project of your choice.


 I hope you have enjoyed today's tutorial, and we look forward to seeing your creations
Please share your creations from this or other La La Land tutorials with us at  La-La Land Crafts by adding your creations to our Facebook Page or Twitter 

Happy Creating 

Sue

Monday, October 28, 2013

Inspiration Monday - Gift Bags and Tags

Hi there everyone, Debra here and this week we have the theme of 
"GIFT BAGS and TAGS"
Here is team Mondays girls with some fabulous projects to inspire you...

Copics Used
Skin E50, E51, E11, E13,
Hair E30, E31, E33, E35,
Dress, Ribbons and shoes, B21, B23, B26, B28
Snowflakes, C1, kindy glitz and pearls
******************

SARA....
         Ornate Snowflake Dies
**************

Copics:
Skin: E000, E00, E21, E11, E04, R20
Hair: Y21, YR23, E15, E18
Outfit: R81, R83, R85, R89
Hearts: R22, R29, R46, R59, C5
************************

DEBRA....
               String of Hearts Border Die
*************


Don't forget, you can join in on all the  La-La Land Crafts fun over on our  Facebook Page, where you can also post your own La-la Land Crafts creations. You can also find us on Twitter!
Have a great week, xxx

Friday, December 14, 2012

Inspirational Friday - Snow and Snowflakes

Hi and Welcome to another awesome Inspirational Friday!!

It's Karen here again this week, to show you all what Team Friday have been doing with this week's theme - Snow and Snowflakes!!

Using Stamp: Snowboarding Marci 
Copic Markers Used:
Skin - E21, E11, E000, R20, R11
Hair - E44, E43, E41
Clothes - C2, C0, C00, YG63, YG61, YG01, YG0000, RV63, RV52, RV00, RV0000
Snowboard - YG63, YG61, YG01, YG0000


Stamp Used: Angel Marci
Copics used -
Skin - E11,E21,E00,E50, R20
Hair - E31,E33,YR30,E50
Wings/Dress - BG72,BG70, C0,C1


Copic Markers Used:
Skin: E0000, E00, E11, R20.
 Hair: E13, E15, E19, E18. 
Clothes: G94, G40, G24, G82, R22, R24, R29, R20, R11, R0000, Y38, Y35, Y32


Stamp Used: Snowboard Marci
Distress Inks Used:
 Antique Linen, Tattered Rose, Bundled Sage, Gathered Twig, Barn Door, Tea Dye, Frayed Burlap & Walnut Stain


Copic Markers Used:
Skin: E000, E00, E11, R20
Hair: E50, E51, E53
Red: E07, R35, R37
Brown: E40, E41, E43
Gold: YR31, Y21, YR24


Stamp Used: Ice Skating Marci
Copic Markers Used: 
Skin: E21-51-50-93
Hair: E57-55-53-51
Green: BG 75-72-11-10
Grey: W5-3-1-0


SANDIE
Stamp Used: Ice Skating Marci
Dies: Water Lily
Copic Markers:
Skin - E000, E00, E11, R20
Hair - E23, E25, E27
Pink - R81, R83, R85
Blue - B21, B23, B24
Brown - E51, E53, E55, E57


In addition, you might want to check out the La-La Land Crafts Company page and Group page on Facebook. We also have a twitter feed! If you haven't joined our groups yet, you might want to think about it because these are the places Irina announces special sales! :)


Don't forget that we would love to see your La-La Land Crafts creations!! Be sure to link them up to the Customer Gallery for a chance to win a prize.


Till Next time
Happy Stamping
Karen and the La-La Land Crafts Design Team 
xxxx