


Today's tutorial is: FUN FOLD CARD
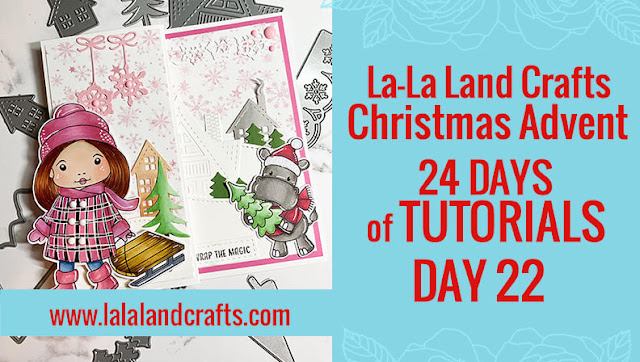
Hello everyone! ANGELA here and I'm sharing a fun fold card featuring Winter Sled Marci and the Holiday Hippos. I love doing different fold cards and this one was so much fun. A fold like this is a great way to set a scene for multiple stamps and dies.

PRODUCTS:
COPIC COLORS
Marci
Skin: E00, 11, 21, R20
Hair: E11, 13, 15, 18
Pants: B91, 93, 95, 97
Hat, Coat, scarf, boots and mittens: R85, RV13, RV34, RV55
White Gel Pen, Copic Multiliner
Hippos:
T1, 3, 5, N1, 3, 5
Reds: R35, 37, 59
Greens: G07, 24, YG45
Lantern: C1, C3, Y06, 08
White Gel Pen
Tree: G07, 24, YG45
Houses: E31,33, 35, E23, 25, 27 C1, 3, 5
PAPER CUTS & SCORING
White Cardstock:
(1) 12" x 6" Score at 3" and 6"
various scraps to cut die cuts
Pink Cardstock:
(1) 5 3/4" x 5 3/4"
Green, Yellow, Gray, Light Pink cardstock:
Various pieces for die cutting
Patterned Paper:
(1) 4 1/2" x 4 1/2"
(4) 2 3/4" x 5 3/4"

Start by scoring your cardstock on the 12" side at 3" and 6". Once scored, crease.

Cut a piece of Pink Cardstock at 5 3/4" x 5 3/4" and a piece of pattern paper at 5 1/2" x 5 1/2". I originally intended on using the plaid pattern, which is why it's up on that side, however I ended up using the other side as I liked how the snowflakes looked.

Adhere the pattern to the Pink layer and adhere to the largest part of the card. Next cut 2 pieces of pattern paper at 2 3/4" x 5 3/4".

Adhere these to the smaller folds.

Next cut several hills from the Double Stitched Hills Border Die. I cut several down at 2 3/4" in width for the smaller flaps.

I next lined these up and adhered to the card to set up my scene.
I next took the various dies that I had cut and started to lay out how I might want the scene to look. This is a great way to determine how many dies you might want to use.

I colored the various dies (but decided to keep the Ski Lodge Die white).
I then started laying out more of the dies I cut again trying to add to my scene.
I used Art Glitter Glue to adhere my dies in place. I used foam tape to pop up Marci, however I did not for my hippos as I did not want the extra bulk.

I used the tag from the Curved Pocket Die to stamp my sentiment.

I decided to put magnets on the backside of the smaller flaps to allow my card to sit flat. I used double sided tape to secure in place with glue dots under.

I cut 2 additional pattern pieces at 2 3/4" x 5 3/4" and adhered to my flaps.

With the card folded back:

Card open:

Close up on this scene:


I hope that you enjoyed my tutorial on this fun fold card, sure to make anyone smile.
.
---------------------------------------
|
|

|
|
|
|
|
|
|
|
Great folded card, easy to follow tutorial and adorable at that.
ReplyDeleteI love these fun fold cards! They make the most beautiful cards with more real estate to play with! Thanks for sharing!
ReplyDeleteAngela, I really love this card! Her jacket is awesome!!! Thank you and Merry Christmas to you and your family!
ReplyDeleteI love this tutorial! I like the way you used the die to make snow hills... beautiful coloring --what did you use for Marcis buttons? Awesome card, Thank you Angela!
ReplyDeleteI just love the pinks!! The girl and her hippo friend are really cute. And the houses are really sweet. I like how you used colored paper AND white. Really great card.
ReplyDeleteThis is so cute. I love the fact that you used a fold card. You did something different.
ReplyDeleteI love different folds for cards, this one is so cute with Marci and the hippo xx
ReplyDeleteLove interactive cards - this one so cute with Marci and her friends!!!!
ReplyDeletePink is my favorite color & love how you decorated
ReplyDeletethe winter outside scene on card front! The magnets
on the flip side covered with cardstock is a great idea!
Adding Marci with sled just completes your beautiful card!
Happy Holidays! ❄
What a fun card! Love Marci with the sled, she is so cute! Need to add her to my wishlist! Thanks for sharing with us💕
ReplyDeleteI love making card with different folds! Love the scene you created and all the wonderful details! Great stamps and dies!
ReplyDeleteSo cute! I can hardly wait to try this! Thank you 😊
ReplyDeleteAdorable card!!!
ReplyDeleteSo much inspiration here and ideas for new things to try. Love them all!
ReplyDeleteSo sweet! Love the buttons on her coat. All the little touches on an amazing project. Thanks for your tutorial it helps a great deal.
ReplyDeleteWhat a fun and adorable card Angela!! Love all your creativity, Thanks for sharing!!
ReplyDeleteAbsolutely adorable! Can't wait to try making this folded card.
ReplyDeleteLove how it creates a panoramic scene.
ReplyDeleteSweet card, the images are so beautifully colored
ReplyDeleteLove this and the coloring is fabulous
ReplyDeleteLove the colors as always you just amaze me with your coloring.
ReplyDeleteI love your card! Marci's coat is beautiful, love the white buttons however you made them. The colors are beautiful.
ReplyDeleteI'm loving all the cardstock in these tutorials. I need to use all the ones I have so I have an excuse to buy lalaland cardstock:)
ReplyDeleteGreat idea! Love the card.
ReplyDeleteI've forgotten how fun these kinds of cards are to make and to receive. Very cute and sweet pink Marci!
ReplyDeleteGreat tutorial, easy to follow directions and cute card. Thanks for sharing.
ReplyDeleteAwesome card and tutorial - love the idea of using magnets!
ReplyDeleteMarci's coat is gorgeous!
Love this Angela! Great tutorial too.
ReplyDeleteDELIGHTFUL card!
ReplyDeleteLOVE your scene and fancy folds - WOW - it will make a beautiful display on the lucky recipients mantel!
THANK YOU for sharing, inspiring and making me smile :)
PS - interesting use of the magnets, I need to try this too
This comment has been removed by the author.
ReplyDeleteLove, Love, Love!!!! My to do list is getting LONG! Will be having so much fun though!!
ReplyDeleteAwesome awesome awesome!! This is another great card!
ReplyDeleteI want to make this one for sure.
ReplyDeleteToo cute!!!! I love the way Marci is colored. Now I need this stamp.
ReplyDelete