


 Today's tutorial is: BATH BOMB GIFT BOX
Hello everyone! ALLISON here and I'm sharing a quick and festive mini gift box to tuck some yummy bath bombs into. Christmas is my most favourite season! Im the person who puts my tree up the first week of November and would put it up earlier if I wouldn't be judged. lol. I love the lights, the music, the food, and of course the family and visitors I get to spend the holiday season with.

PRODUCTS:
SPECTRUM NOIR COLORS
Hedgies - TN3,TN2,TN5,MB2,MB1
Shirt/Shoes - GT3,GT2,GT1
Red - DR7,DR5,CR10
PAPER CUTS & SCORING
1x Coloured Card Stock 9" x 8"
4 x Coloured Card Stock 1 7/8" x 3 7/8"
4x Patterned Paper 1 3/4"x 3 3/4"
2x Coloured Card Stock 1 7/8" x 1 7/8"
2x Patterned Paper 1 3/4" x 1 3/4"
1x Coloured Card Stock 7/8" angled on each end
1x Patterned Paper 3/4" angled on each end
1 x 2 7/8" x 4 7/8"

Start by cutting a 9" x 8" sheet of coloured card stock and scoring on the 9" side at 2", 4", 6"and 8" On the 8" side score at 2" and 6"
Cut along score lines towards the center 4" sections.
Cut away the sides of the 1" and next 2" piece.
Leaving the center section in place. It should look like this
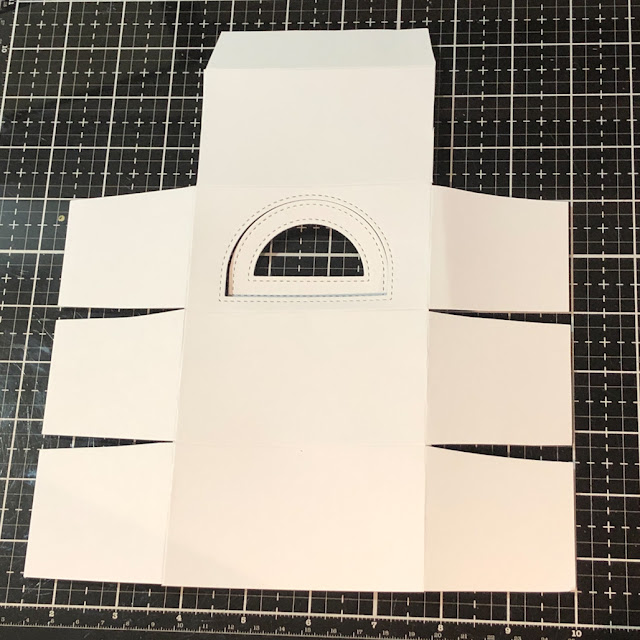
Place small stitched dome die cut on the first row that has not been cut away and run through die cutting machine. Using the snowflake stencil and oxide ink in barn door, ink up the backside of the box. This is the pattern on the inside of the box. Set with shimmer spray and let dry.

Using double sided tape assemble box.

Cut and glue together coloured card stock and glue panels to the outside of
each side of the box.

For the window section run the coloured card stock and patterned paper panel once its glued through the die cutting machine first then attach to box.


Inside base for bath bombs
Cut card stock at 2 7/8" x 4 7/8"
Score on the 2 7/8" side at 1/2" and 2 3/8"
On the 4 7/8" side score at 1/2" and 4 3/8"
Cut along score lines at opposite ends

Run through die cutting machine twice with smallest Double Stitched Hexagon Die to create holders for bath bombs.

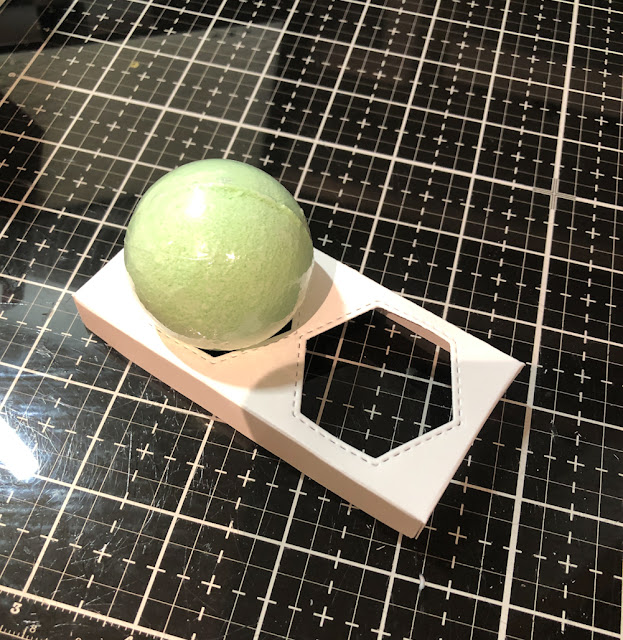
Add a strip underneath to help support the center.

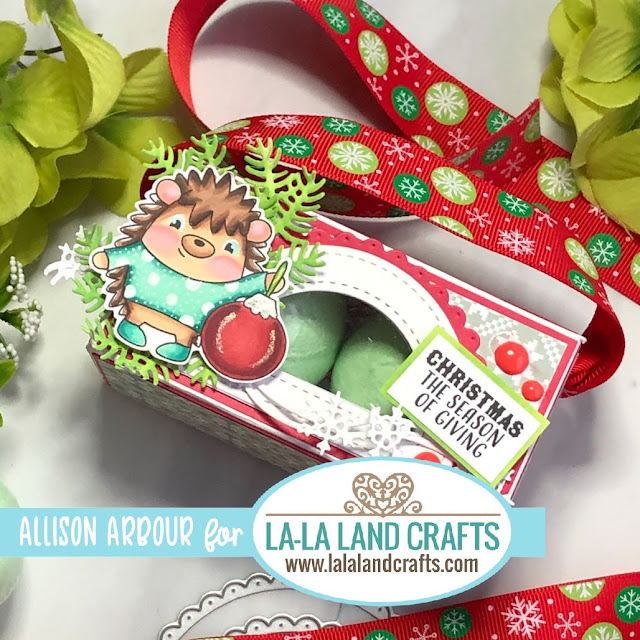
Finish the gift box by adding a scalloped dome die cut in front of the window, add acetate to the window and add the stitched dome frame on top, and a snowflake border die cut towards the bottom. Tuck some Pinecone Bough die cuts inked up in mowed lawn oxide for behind the hedgehog. Attach sentiment and hedgie with
foam tape and add some nuvo drops.
Optional
Hole punch sides of box to attach a ribbon for a handle to the box.
---------------------------------------
|
|

|
|
|
|
|
|
|
|
Great project, fab gift idea! Love it.
ReplyDeleteI love how easy it is, but looks so professional, the little hedgehog is super cute too 😍 x
ReplyDeleteThose Hedgehogs are pretty darn cute!!! This is a fab tutorial!!! Giving me ideas! Thank you so much Allison!!!! <3
ReplyDeleteWhat a great idea!!! Gotta go check..think I have all the dies!! If I don't then Happy Birthday to me! LOL
ReplyDeleteThis is such an adorable gift! Your recipient will be thrilled!
ReplyDeleteThis handled box is so cute. I LOVE the hedgehog. Great design!!!
ReplyDeleteFabulous tutorial!
ReplyDeleteGreat idea: use of stencil and hexagon die!
ReplyDeletecute box tutorial...thanks for sharing
ReplyDeleteLove this, the colors are awesome, it is just adorable!!
ReplyDeleteWhat a darling little gift box, so cute! Thanks for the great tutorial.
ReplyDeleteWhat a great way to present bath bombs to someone as a gift. You have really dressed them up. Thank you for the idea.
ReplyDeleteGreat idea, but might have to substitute with Lindor chocolates.
ReplyDeleteSo festive! Cute little hedgehog! What a great idea to use the hexagon die to make a holder! Thanks for sharing 💕
ReplyDeleteWhat an awesome idea. Just went to a baby shower and the favors were bath bombs and this would have been a great way to present them. It was for twins and theme was Oh Baby - 2 peas in a pod. Perfect, thank you.
ReplyDeleteWhat a great idea. I can't wait to try it. I love the little hedgehog.
ReplyDeleteThanks for sharing how to assemble a cute gift box to hold 2 bath bombs!
ReplyDeleteThis is a great idea in making a gift/treat box! 🤶🏼🎄🎅🏼
Awesome gift box! I love the clever use of the hex die to make the bath bomb holder! The hedgie is adorable!
ReplyDeleteThanks for sharing the tutorial. Love how it turned out.
ReplyDeleteSo much fun! Can't wait to try it. Love it
ReplyDeleteCute project, and practical too! Thanks for sharing.
ReplyDeleteGreat project! Thanks for sharing this wonderful design.
ReplyDeleteThank you, deafently going to do a few of these
ReplyDeleteThis is a neat way to give these! I am going to have to try this one!
ReplyDeleteAdorable bath bomb gift box!
ReplyDeleteThis is so cute! I love how you even added detail to the inside of the box.
ReplyDeleteHow cute is this super cute and thank you for sharing!
ReplyDeleteReally love this box! Thanks!
ReplyDeleteThis is Amazing!!!
ReplyDeleteThat’s how you fit a round ball in a square box. This is a fun presentation fir these bath bombs.
ReplyDeleteCute box idea. Could put chocolate balls in it.
ReplyDeleteWhat a great idea
ReplyDeleteThank you for the idea! Next craft I need to learn... making bath bombs! Haha :)
ReplyDeleteI am going to make this for my mom and fill it with Lindt chocolates! What an adorable gift idea!
ReplyDeleteWonderful gift idea, it looks fabulous, inside and out!
ReplyDeleteTHANK YOU for sharing the tutorial and special finishing touches :)