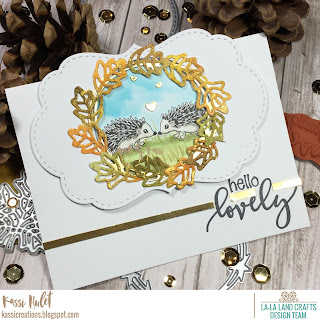
Hello everyone! Kassi here with you today with a fun technique for adding texture to the Filigree Leaves dies from La-La Land Crafts, then turning them into a wreath for a card !
What you will need:
Plus..
White cardstock
Tissue Paper
Gold foil cardstock
Glue stick
Distress Ink in: Seedless Preserves, Rusty Hinge, Forest Moss, Mustard Seed
Metallic gold acrylic paint
Craft foam sheet
Felt
Blending tool
Craft Sheet
Foam tape
Coloring...
Copics
Hedgehogs- W00, W1, W3, W4, W8, R00
Grass- YG93, YG95, G20
Sky- BG000, BG53
Let's get started...
Step 1: Cut a piece of white cardstock to 4 1/4 inches by 5 1/2 inches. Cut a piece of tissue paper (that thin paper you stuff in gift bags) slightly larger than your cardstock. Scrunch the tissue paper up in your hand to form a ball, than open it up again and flatten it out somewhat.
Step 2: Completely cover your cardstock with glue from a glue stick. Make sure to get the edges too.
I'm not using any thing fancy.. just a cheap glue stick from the school supply section of my local store.
Step 3: Press your crinkled tissue paper onto the glue. Allow to dry.
Step 3: Using an ink blending tool, add various colors of Distress ink over your tissue paper.
Step 4: Cut a piece of craft foam sheet, and a piece of felt to the same size as your ink blending tool. Glue the felt to the foam and let dry. You should then be able to stick your craft foam piece to the velcro on the blending tool.
Step 5: Put some metallic gold acrylic paint on a craft sheet, and pick up a very thin layer of paint with the blending pad we just made... It helps to lightly drag the foam over the paint, then smear it off on the craft sheet so you only have a little left on the pad. Lightly skim over the tissue paper. The firm foam pad combined with the very thin layer of paint should leave you with paint just highlighting the texture of the wrinkles.
Step 6: Die cut 4 maple leaves from the Filigree Leaves set.
Your paper will be plenty big for this so you can pick and choose what areas you like best.
Now, to turn our textured leaves into a wreath for our card...
Step 7: Cut apart the maple leaves... you should get 5 smaller leaves from each maple leaf.
(The areas you want to cut off and discard are marked in purple in the photo.)
Step 8: Die cut the Star Wreath from gold foil card stock. Die cut the largest Nested Frames Large from white cardstock, then die cut the third largest circle from the Stitched Nested Circles out of the center of the Nested Frames Large die cut.
Step 9: Stamp, color, and fussy cut two hedgehogs from Happy Fall. Color a simple background on the circle die cut. Glue on the hedgehogs. Die cut the hearts on the bottom of the tag from Photo Elements out of gold foil cardstock and adhere to circle.
Step 10: Glue the Star Wreath to the edge of the hole in the Nested Frames Large die cut. Glue leaves around to form a wreath. You can add more or less leaves, depending on your preference. You'll have some left over, but you want enough to have options as you are choosing which leaves to use.
Step 11: Cut a piece of white cardstock to 8 1/2 inches by 5 1/2 inches. Fold in half. Stamp Hello Lovely sentiment in the bottom left corner. Cut a thin strip of gold foil cardstock and adhere across card front. Cut where needed to fit the sentiment.
Step 12: Glue on your scenic circle.
Step 13: Adhere Nested Frame Large die cut with wreath over circle using foam tape
I love the texture this technique gives the Filigree Leaves, and the veins of gold really add an extra pop!
Thanks so much for stopping by today.. I hope you have been inspired by this technique, and I hope you will give it a try.. Either with the leaves, or any of your La-La Land Crafts dies!
Hugs- Kassi


Looks lovely and
ReplyDeletecute Hedgehog!
Carla from Utah