Hi, Elizabeth here, with a tutorial for you.
I had so many emails, comments and messages after I made the bottle wrapping for this weeks mini- release, asking me how I made it. That's why I decided to put the tutorial I made on hold until next time, and show you how to make this bottle gift wrapping.
Here's how I made it, inspired by a Norwegian tutorial in metrics found here, but I made some changes just because.
You will need a 12 x 12" kraft or cardstock.
Score 2 inces from each side.
Turn the paper and score at 2",4", 6",8" and 10". The bottle wrap will have 5 sides- Iwill use the last panel to glue it together.
Next, make a mark at 1", 3",5", 7" and 9" with a pencil og pen.
Use a ruler and bonefolder to score from each corner on to the pencil marks.
Cut 3/4" off the top, to make it look nicer around the top of the bottle.
Cut little "triangles" between the bottom squares. This will be under the bottle.
Crease the folds. Use a hole punch to make holes in the little triangles on top. This is for the seam binding.
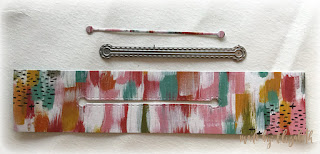
Here are my panels, pattened papers and dicuts. You can decorate any way you like.
I used:
5 panels of 7 7/8 x 1 7/8 of white cardstock
5 panels of 7 5/8 x 1 5/8 patterned paper.
See list of dies at the end of the post.
To make a fun detail with the puzzle pieces I used the big stitched slot dies on one of the panels. I will fill it with puzzle pieces.
Adhere the panels to the base. I diecut 5 hearts from the puzzle die to go on top of each side.
Add glue on the last "panel" and glue it to the first.
Under the bottle I will glue the "flaps" one by one, that way i can make sure they are properly attatched. A tip here is to put the bottle inside while you glue- it will make it easier.
For the little card on top i fold a piece of white cardboard in two an make a double circle diecut, making sure a part of the paper is inside the circle while i diecut.
Glue it on to a circle dicut and the matching pierced scalloped circle diecut in patterned paper. Punch a hole in it and tie it on with the seam binding on top of the bottle.
I decorated the little card using a couple of the cute heart puzzle pieces.
To make a border around the white diecut, I use my scalpel on the pink one, following the stitches for an easy cut.
You can se the patterned paper frame around the oval.
Copics used:
Skin: E13-11-21-000, R20, R32
Hair: W)-7-5-3
Greens: G99, YG67-63-61-03
Pink: R89-85-83-81
Finally I add the large pierced scalloped circle (cardboard) and the large stitched circle (patterned paper) under the bottle.
La- La Land Crafts Products used :
Stamp:
Dies:


Thank you Elizabeth, so easy to understand. Great project for all of us. Will be making this
ReplyDeleteThanks Diane! Please share, I want to see😊
DeleteHugs