Hi All,
Debbie here today with a tutorial that has a little bit of colouring and a little bit of card construction for you. Recently I have been asked how I did both of the techniques I am going to show you so I thought I could combine the two in one little notecard.
I hope you enjoy....
La-La Land Products Needed
First let's get Marci coloured up...
FYI the full Copic List is at the bottom of the post
I am going to show you how I add roses to her dress but first I like to add some shading as you can "blend out" the crispness of your roses if you do it afterwards
Using R22 start adding some squiggles in a circular pattern where you want each rose to be.
Then add some depth to the roses with your R29.
Note - You can do any colour roses you like just make sure you have a dark shade and a light shade.
Add some leaves by adding some squiggles of G24, I aim for 2 leaves per rose.
Finish off the leaves with some deeper green veins done using G29.
Set Marci aside.
To make your notecard die cut 2 of the largest double stitched circles, 6 small flowers and the inside of the cameo frame in white. Also die cut the cameo frame and one of the largest pierced scalloped circles in red and the tree branch in green.
Emboss one of the white circles and cut and arrange the tree branch to create a spray. Cup the flowers and add a red rhinestone to the centre of each. Glue 5 of them to the tree branch.
You may also see I have trimmed off part of the cameo frame. When I laid out the card before gluing the part I removed was sitting between Marci's legs and I thought it looked neater without it.
Now onto construction of the card....
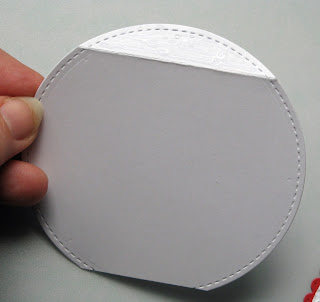
Take the unembossed stitched circle and trim off a little piece. Then score about 1/2" down from the top, parallel to the flattened base. The scored section becomes your card hinge and the trimmed off bottom stops your round card from rolling sideways.
Note - You can use the same hinge technique with any unusual shapes but the flattened bottom is only required if your card won't sit straight.
Add some glue to the hinge and glue behind the piece you are using for the front of your card. For my card front I have attached the embossed circle to the scalloped circle.
As you can see here we have now created a free standing card.
Decorate the front of the card as shown using your die cut pieces. Attach the tree branch behind the rose Marci is holding.
Lastly attach Marci to the card front using 3D foam.
Copics Used
Skin - E11, E00, E000, R24, R20, R11
Hair - 100, C10, C8, B28
Clothes - R89, R29, R27, C4, C2, C00, 100
Marci's Rose - R29, R24, R22, G29
Squiggle Roses on Dress - R29, R22, G29, G24
I hope you enjoyed this tutorial and found the techniques useful.
Until next time...Happy Stamping
Debbie
xXx


Just gorgeous! Your hand drawn roses are amazing!
ReplyDeleteAmazing, thank you for sharing.
ReplyDelete