Showing posts with label Star Boy Luka. Show all posts

Monday, January 9, 2012

Inspiration Monday-- Make a Scene

Good Monday Morning to ya from me, Rosie! :) Now that the holidays are over, are you getting geared up for 2012?! Hard to believe we are 9 days into the New Year! So, do you know what's right around the corner, other than Valentine's Day?

CHA baby!! Yes, that's right....at the end of January will be the next Craft & Hobby Association Convention in Anaheim, California. Now's the time to get with your local scrapbook stores and let them know about La-La Land Crafts so they can scope us out at CHA and bring our stamps to their stores!!

If you haven't been to the LLLC Store in a while, you may have missed some of the new things Irina has added. You should head on over and check out the "OTHER" section... Irina is now carrying sentiment stamps and Cheery Lynn Dies!! The other new items that I'm really loving are the DIGI SCENES....so convenient and easy to use!

So to bring us into our 2nd week of the New Year, our challenge this week is:

MAKE A SCENE

Check out the amazing work our DT did on this challenge! They totally blew me away!!

Cindy Haffner using Baking Marci
Copics:
Skin: E00, E11, R20
Hair: E35, E33
Red: R24, R46
Greens G21, G82

Copics:
Skin: E00, E02, E30
Reds: R05, R35, R46, R24
E19, E17, E15, E13
W1, W3, W5, W7
C1, C3, C5, C7, Y06, Y17
Prisma pencils for Hair

Copics:
Hair/shirt/boots: E27, E43, E21
Skin: E53, E51, E50, E93
Balloon: YR68, R05, R27
Pants: BG13, BG34, BG10

Copics:
Hair: E49,E59,E25,E53
Face/Arms/Legs: E000,E00, E11, BV00
Blouse: B000,B97,B99,B000,B02,W3 Atyou Spica #06 Melon
Capri Pants: YG000,G99,YG95,YG11,Atyou Spica #06 Melon
Lips: Atyou Spica Lipstick (21)
Shoes: B02, W3, Atyou Spica #09 Sky Blue
Airbrush C00
Opaque White

Copics:
Skin: E000, E00, E01, E02, R20
Hair: E27, E47, E49
Shoes: W1, W5, W7, W8
Balloon: R14, R24, R35
Dress: Y00, Y11, Y21, YR31, YG03, YG17

Prismacolor Coloring:
Skin - peach; seashell pink; pink; Burnt Ochre
ginger root, light umbra, burnt ochre, dark brown, scarlet lake, crimson lake, sand, yellow ochre, powder blue, indigo blue cool grey 30%

Copics:
Skin: E000 E00 E11 E21
Hair: E30 E33 E35, E23 E25 E27 E29
Cream clothes: Yr30 E50 E51 Pink R81 R83 R85 Rv10
Brown Clothes: E41 E42 E43 E44 Bench W1 W3 W5

Copics & Chalk:
Skin: E000, E00, E02, E11, chalk
Lips: R20, chalk
Hair: E57, E25, E35
Dress/Hairbands: Paper-pieced & shaded with chalk, stardust stickles
Shoes: shaded with chalk, stardust stickles
Balloon: Paper-pieced
Presents: Paper-Pieced, MS Blue glitter, B02, B04, B05, YR02, YR04, YR07, stardust stickles
Garden Bench: E49, E29, E37, E33, N4, N6, N8
Bird: B02, B04, B05, G02, G14, YG17

Now don't forget you can play along with us all month long by uploading your creations to our Customer Gallery! Check back here on Friday for more AWESOME creations by my fellow DT sisters!

Have a great week!
Hugs,
Rosie and the LLLC Team

Friday, December 2, 2011

Inspiration Friday - Black & White

Hidey Hoe everyone, it's Sue here and I can't believe where the week has gone!!
Before we know it Christmas will be upon us yet again!

Following on from Monday's beautiful showcase of the 'Black and White Inspiration', the Friday team is sharing their spin on the inspiration!

Here is what our fabulous DT came up with.

Copic Markers:
Skin: C00, C1, C3, C4
Hair: C7, C5, C4, C1
Suit: C7, C4, C2, C1
Hat: C00, C2, C4
Flower: C7, C6, C5, C4, C2
Ring:C5, C4, C3, C2, C1


Copic Markers -
W00, 01, 03, 05, 07, 09


Copic Markers
Skin: C00, C1, C3
Hair: C5, C9
Clothes: C3, C5, C7, C9
Koh-i-norr orange pencil used over the pumpkin


Copic Markers:
Copics:W00, 01, 02, 03, 04


Angie using Snowboarding Marci
Copic Markers
Copics: W00, W1, W3, N0, N1, N3, N5, C0, C1, C3, C5, R20, R30


Lou using Marci with Rose
Copic Markers
Skin- Cool Grey 1, 2, 3
Reds- E07, Crimson, Burgundy
Dark Greys- Cool Grey 4, 5, Black


Lil' Old me using Star Boy Luka
Copic Markers
Face/skin: E0000, E00, E11, R01, R02
C00, C0, C1, C3, C5, C7, C9


We hope our post today inspires you to be creative. Remember to link up in the Customer Gallery if you play along. You could be the lucky winner of our monthly prize- a gift certificate to the La-La Land store!!..

Sue & the LLLC team.
xx

Friday, July 15, 2011

Inspiration Sketch by Me (Michele)


Good morning everyone!!! This is Michele and today it's my turn to welcome you to the La-La Land Crafts Inspiration Friday.

Every Monday and Friday La-La Land Crafts Design Team will be bringing you a new inspirational  theme.  You are more than welcome to play along as we would love to see your creations with La-La Land Craft stamps. Please link your projects to our Customer Gallery.

This week it’s my turn to set the challenge and I’ve designed a sketch for you to follow:-

Picture1

And here is the wonderful inspiration from the DT:

Cindy has used the adorable Luka with Truck

263972_10150240271471301_538571300_7935399_1622668_n

Copics used:
Skin E00, E11, E51, R20
Hair E15, E27, E33
Shirt Y21, Y23
Outfit B01, BG10

Jeanette has used the pretty Marci Ballerina

266747_121941734563265_100002423164013_176086_2059980_o

Copics used:
Skin: E000, E00, E01, R20
Hair: E41, E43, Y21
Clothing: R000, R81, R83, R85, G20, G82
Shadow: C00, C1, C3

Michele (me) has used the adorable Star Boy Luka

DSCF0960

ProMarkers used:
Skin: Cocoa, Coral, Sunkissed Pink & Blush
Hair: Blush, Cinamon AquaMarkers: Mahogany
Top & Boots: Royal Blue, Sky Blue & Cool Aqua
Shorts & Gloves: Cool Grey 3, Cool Grey 1 & Blender pen
Black Tones: Black, Warm Grey 4, Cool Grey 3

Sandie has used the adorable Star Boy Luka

278570_220517131322897_100000938358034_642323_7517249_o

Copics used:
Skin - E00, 01, 11. R20
Hair - E42, 43, 44
Oranges - YR 21, 23, 24
Teal - BG70, 72, 75
Greys - C1, 3, 5, 8

I Hope that you've enjoyed our fun sketch challenge. We hope to see your cards in our Customer Gallery. 

Thanks for stopping by!

Hugs Michele xxx

Friday, November 19, 2010

SALE!! plus Birthday Chipboard Album

Happy Friday, everyone!

First of I want to remind you that today we are having a BIG SALE on all Marci and Luka, all stamp sets plus the cute panda!! Today and ONLY TODAY! They are all 20% off (excluding digis).  Scroll to the post below or click HERE for more details

As always, shipping is FREE on orders of $50 and over!!  What a GREAT deal combined with the SALE Discount!!

Don't let this great deal pass!!  Click HERE to go to our store, you might want to start your Christmas Shopping EARLY!!  ;-)

Have fun shopping! 

~~~~~~~~~~~~~~~~~~~~~~~~

Onto my post...

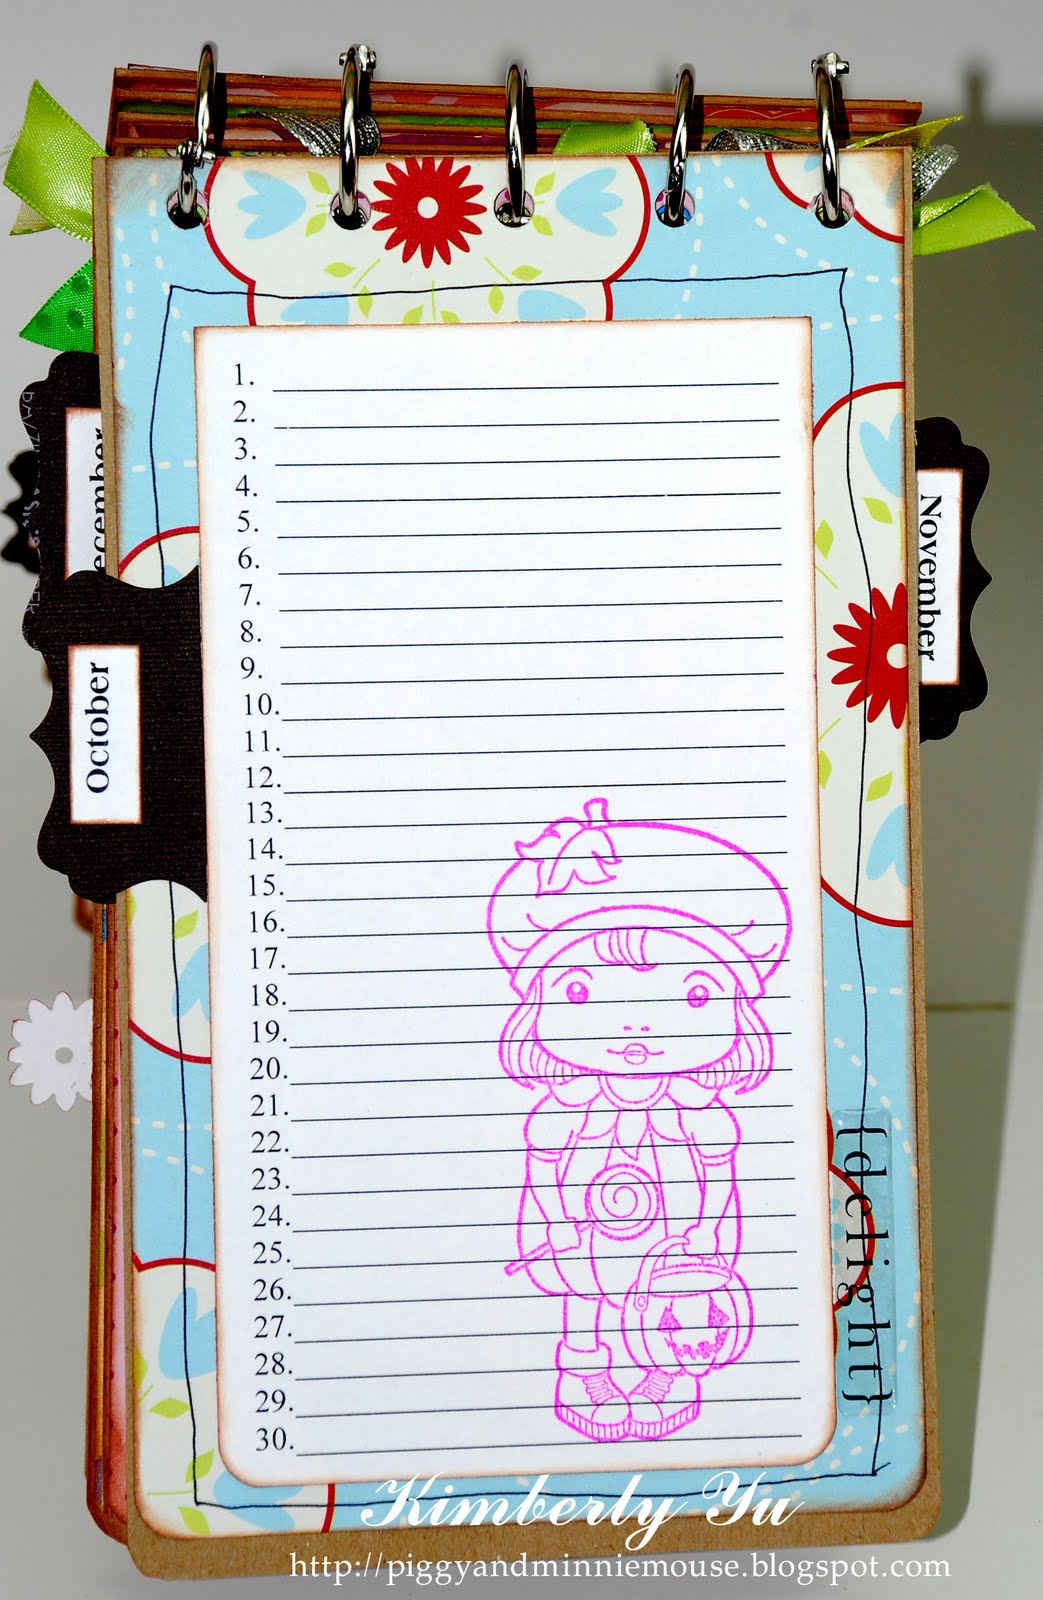
After checking out the Cinch at the Scrapbook Show last month, I was in the mood to make albums! LOL I didn't get the Cinch at the show but it did inspire me to create this album!

The album itself didn't take me long to finish but using a single hole puncher to punch these holes was a pain! Now that I've completed this album, I ordered myself a Cinch! LOL I guess I do things in reverse. LOL I haven't tried the Cinch yet but I am sure it's way better than a single hole puncher!

Anyway, I thought it would be a cool idea to have a little book of all my friends' birthdays. These books are handle. I keep books of everything. hehe

This book measures 5 x 8 1/2 inches. I used Marci and Luka images..plus the little adorable panda.

For the cover, I used Marci With Rose.

January: Sweet Dreams Marci
February: Winter Marci
March: Panda
April: Marci With Rose
May: Birthday Marci
June: Star Boy Luka
July: Super Cupcake Marci
August: Marci With Rose
September: Pirate Luka

October: Pumpkin Marci
November: Ice Skating Marci
December: Birthday Marci

So what do you think? Pretty cool, huh? I wasn't thinking so I repeated a couple of Marci's. I had really wanted to use a different image for each month.


Wednesday, October 27, 2010

I Need A Hero


Hi I'm Shantaie Fowler and a big "Hello and Happy Wednesday" to you all! Could you use a Hero today? If you are like me an everyday hero is probably easier to find than a super hero that can leap tall buildings in a single bound.

Star Boy Luka is the perfect guy to to celebrate the heroes we have in our lives each and every day! Watercolored  with markers in muted oranges, reds, and turquoise Star Boy Luka is bold, brave and ready to go.


Be sure share your latest creation in the customer gallery it just makes our day to see the fun and inspirational ways you are using your La-La Land  Images,  { you could even say that makes you our hero! }

Thank you so much for visiting today, we appreciate you  spending part of your day here with us here in the Land Of La-La! *grin*

Sunday, October 24, 2010

have a super day

Happy Sunday! This is guest designer Alice. Here is a simple boy card that I made using the adorable Star Boy Luka.


I paired him with Cosmo Cricket's Boyfriend collection.  I cut out the sentiment using a set of QuicKutz alpha die.  We also have a stamp set that coordinates with both Super Star Luka and Super Cupcake Marci, it includes Skyline Window, various sentiments and some coordinating stamps!!

That's all from me. Thanks for stopping by! =)

Wednesday, October 20, 2010

Have a SUPER Day!


Happy Wednesday!!  Kris here, to share my card featuring  Super Star Boy and his dog, Tuffy!  Aren't these stamps so fun?!  If you haven't gotten enough of them yet, just scroll down through our daily posts here... the DT has been knocking out beautiful and creative cards to hopefully inspire you and show off these awesome stamps.  If you have some of these stamps, please show us what you've made... just click on the CUSTOMER GALLERY and link up your card!  Also... Irina has something HUGE coming very soon that everyone will be able to enjoy so stay tuned for that!!  =) 

I used my daughter's new sketch over at Sketches by Carly.  The paper is called Wander, by Basic Grey... LOVE THIS paper, it's so perfect for these new stamps!  You can see more of what I've been creating at my blog, Ink Something 2. 

Have a wonderful Wednesday!! 

Sunday, October 10, 2010

Star Boy Luka

Hi all! Here is a guest designer Alice. Today I am sharing a card made using our Star Boy Luka.


He is so cute! I paired him with BasicGrey's Wander collection. These papers are just perfect for this adorable boy. I used the die cuts from the same collection for the sentiment and embellishment.

That's all I have. Thanks for stopping by!

Friday, October 8, 2010

. . . Star Boy Luka . . .

Happy Saturday La-La Land fans! It's 1LuvnMama again! Did you all get to leave birthday wishes for our Team Member Karen? If you haven't, stop by her blog to give her some luv! :)

It's a bird, it's a plane, NO it's Star Boy Luka! :) He's here to save the day . . .

I created a 4" easel card and embossed the background with my Star Embossing folder. The window behind Super Star Luka and the sentiment is from the Super Hero Window Set.


It's hard to see in the picture but I used my Glossy Accents clear, dimensional embellishment for the moon, the belt buckle and Luka's star emblem.


Have you checked out our Online Store? There so many images to choose from! And . . . there's more in store for you in the next week! :) Thanks for stoppin' in!

Tuesday, October 5, 2010

Super Day from Star Boy Luka!

It's Karen here, and today I am showcasing Star Boy Luka.  He is one of  La-La Land Crafts September releases! Isn't he just the cutest & most brave little Super Hero you ever did see?  I just love his pose!! 


When I saw him, I just knew he'd be perfect for my little nephew's "5th" birday..which is just around the corner!!  The background star shape is from my Silhouette, and so is the little "KAPOW" on the top right hand corner that highlights the number "5"!!  I raised it with pop dots, as well as the white background!  For some texture, I embossed the white background carstock with my Cuttlebug Herringbone folder!  Lastly, I added some little metal brads to the four corners of the card to make it a little more masculine!!   My little nephew's gonna have fun opening this card.  Once I tell him this is him as a Super Hero, I know he will have a little smile on his sweet face!!

If you are interested in purchasing Star Boy Luka, or any of the other new releases, just visit the La-La Land Crafts Store, today!!  Also, don't forget..it's a new month, so I look forward to seeing your beautiful creations during the month of October.  Just upload them at La-La Lands Customer Gallery, for you chance at winning a prize!!

Have a SUPER day!!
Karen

Wednesday, September 29, 2010

{Super} Explosion Box Tutorial


Hi stampers!  I'm Kristine and I have a fun project tutorial to share with you today using the new Super Star Boy (Luka), Super Hero Window Set, and the Tuffy set... it's called an EXPLOSION BOX!   This is a "spin off" of the tutorial posted on SCS.  I changed a few things like the size, cut my corner "wings" off, and added a rooftop!  I hope you will find this tutorial easy as I took lots of pictures along the way, and as always, you can left click on the pictures to enlarge for detail.    

Supplies:
[1] sheet of 12x12 cardtock
[2] sheets of grey cardstock (6.5" square and a 7" square)
[4] sheets of 3 7/8" square designer paper (for inside)
[1] sheet of 3 7/8" square coordinating piece of cardstock
[1] sheet of acetate (or other cardstock for spiral and stand-up tabs)
additional cardstock or images to stand up inside box
Paper trimmer with scoring blade
Scissors
Scallop border punch *Optional
Double-sided tape
Tacky Glue
pencil or pen

Okay, so I'm going to break this down into 4 basic parts:  box, lid, roof, and decorating inside and out. 

Box
1)  Start out with a 12" Square sheet of Cardstock. 
2)  Score at 4" and 8" and then turn your cardstock 90 degrees and scrore it at 4" and 8" on that side.
3)  Cut the corner squares out, using the scored lines for your guide.  It will then look like this:


4)   Set aside... we'll decorate this later.

Lid
1)  Cut a coordinating piece of cardstock (or heavy designer paper) that's 6 1/2" square.
2)  Score it at 5 1/4" on all sides.


3)  Cut the vertical score lines on 2 opposing sides until they intersect with the horizontal ones.
These will be your inside tabs when we glue the lid together.


4)  *This step is optional.  I used my scallop border punch along all 4 sides to give a cuter overhang.  Then you'll want to cut one side of just the tabs down a bit because the scallops won't line up when you fold the tabs in. 


5)  Use strong double-sided tape and adhere to the outside of all tabs and fold in, aligning the corners with the edges of the side strips and pinch together to secure.  


6)  Fold up the sides of box and place lid on.  Set aside.


Roof
1)  Cut a piece of cardstock (or DP) that's the same as your lid at 7" square.
2)  Score 1/2" on all sides.
3)  Using a pencil and ruler, draw lines 3" in and 4" in from the ends.  Turn 90 degrees and do the same.  *see picture below.
4)  Now score JUST the inner square that's formed by the drawn lines. 


5)  Now measure and cut out 1 1/2" squares in all 4 corners. 


6)  Now you need to make 3 score lines (on each of the 4 quadrants).  The first is from the corner of the middle 1-inch square to the corner of the square you just cut out.  The next 2 scores are from the corner of the middle 1-inch square to the points where you scored 1/2" on the sides as in this picture.  DO NOT score all the way through the middle square, just up to the outer corner.


7)  Now you can fold those scored marks.  The 2 outer scores are mountain folds and the middle is a valley fold.  Glue the facing scored sides together as shown.  I use Alene's Tacky Glue because it holds well and dries quickly.


8)  Glue the 1/2" scored edges and fold under. 


 9)  Place roof onto top of lid, aligning the corners as much as possible. 


Decorating your Box
1)  Remove the lid.  If you want to stamp on the outside (or inside) of your box, you want to do that now.  I stamped the Super Hero Window colored with Copics, and taped to outside of box.  I also printed the phrase "It's a bird... it's a plane... it's..." and added to the roof.


2)  Now it's time to decorate the inside of your box.  First I cut 4 sheets of designer paper, 3 7/8" square for the sides, and one sheet of grey for the bottom (same size). 


3)  Now you'll want to gather your elements for the inside!  Here, I stamped and cut out the Super Star Boy and Tuffy, his dog as well as Tuffy's ball and bone, and some stars from the Super Hero Window set (all from http://www.lalalandcrafts.com/).  I also cut out some spirals and stand up tabs out of acetate window sheets to adhere the stars and the stand up pieces to.


4)  I attached one end of a circle spiral (acetate) with a glue dot to the middle of the left side panel.  Then glued the other other end of spiral to the back panel.  Then I did the same with the other spiral to the front panel and the right panel. 

5)  To cover up the ends of spirals that we just glued down, I used glue dots again to attach a circle star on top, and then glued stars randomly along each spiral like this:

  
6)  I made some tabs out of acetate and glued my Star Boy Luka and dog and the ball to the tabs and glued those down on the grey piece.  You could also attach a sentiment if you wish.  Here's a better view of the spirals and then the inside as a whole. 


That's it!   Sure to put smiles on any boy... I mean SUPER BOY you know!!  Hope you'll give it a try.  Happy creating!  *Ü*