Hello everyone! Welcome to Tutorial Thursday!
MEG here with you today to share a tutorial with you!
Today's tutorial is: Netting Shaker Gift Tag
Today I'm going to share with you a simple shaker gift tag design using some of our new Carnival-themed products! I will use netting for the shaker, too, which will be new for some of you!
PRODUCTS USED
Best of Times Clear Stamp Set
Enjoy the Ride Clear Stamp Set (for sentiment)
At the Carnival Paper Pack
Large Stitched Tags Die
Double Stitched Dome Die
Scalloped Dome Die
Small Stars Die
Enjoy the Ride Clear Stamp Set (for sentiment)
At the Carnival Paper Pack
Large Stitched Tags Die
Double Stitched Dome Die
Scalloped Dome Die
Small Stars Die
DIE CUTS
designed paper - 1 largest Large Stitched Tags Die
white cardstock - 2 largest Double Stitched Domes Die. For one of these, cut out a "frame" using the middle-sized dome.
gray cardstock - 1 largest Scalloped Domes Die
white cardstock - 2 largest Double Stitched Domes Die. For one of these, cut out a "frame" using the middle-sized dome.
gray cardstock - 1 largest Scalloped Domes Die

~ now for the tutorial you have been waiting for ~
STEP 1. Using the solid stitched dome you just cut, stamp the Best of Times carnival backdrop in peach ink. Here is a photo of where to place the stamp for stamping.
STEP 1. Using the solid stitched dome you just cut, stamp the Best of Times carnival backdrop in peach ink. Here is a photo of where to place the stamp for stamping.
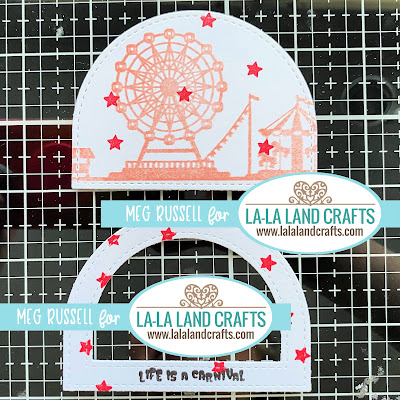
Your stitched dome pieces will look like this at this point:
STEP 2. Using the small star stamp from the Best of Times clear stamp set, stamp some stars in pink onto both stitched dome shapes. Add the sentiment as shown from the Enjoy the Ride clear stamp set.
STEP 2. Using the small star stamp from the Best of Times clear stamp set, stamp some stars in pink onto both stitched dome shapes. Add the sentiment as shown from the Enjoy the Ride clear stamp set.
STEP 3. Now it's time to make the shaker. Apply double-sided tape to the back of the dome "frame".
STEP 4. Cut a piece of netting (tulle) and stretch it over the exposed tape. Press down to secure. Make sure the netting is taut, and not "bunchy" or loose across the shaker opening.
STEP 5. Using paper snips, trim the excess netting so that there is no overlap over the outer edge of the dome.
STEP 6. Apply foam tape on top of the netting to create the shaker frame. Make sure there are no gaps between your foam pieces, or the shaker elements may be able to slip through those cracks.
STEP 7. Now you're ready to assemble your shaker. Pile up your shaker pieces in the center of the base which is your carnival-stamped dome. Take the backing off the foam tape, and adhere.
STEP 8. Glue the shaker base onto the scalloped dome.
STEP 7. Now you're ready to assemble your shaker. Pile up your shaker pieces in the center of the base which is your carnival-stamped dome. Take the backing off the foam tape, and adhere.
STEP 8. Glue the shaker base onto the scalloped dome.
STEP 9. Attach the dome shape to the tag base using dimensional foam.
Make sure to join our LLLC FAN GROUP on Facebook for more ideas,
inspiration and a general chit chat about our products!
Hoping you all have a great week of Creating
Meg :)
Click on the buttons below to find us on these social media sites:


No comments:
Post a Comment