Hi and welcome to Tutorial Thursday! Today I'll show you how to make a bottle tag with pocket using la-la land crafts products.
To make a bottle tag with pocket you'll need:
white cardstock
design paper
paper flowers
cheesecloth
printed/stamped image
scoring board
cutter / scissors
adhesive
glue gun
dies
Step 1:
Take your cardstock and cut out 8.5" x 8.5" big square. Then take you scoring board and make scores accordin to the sketch below.
Step 2:
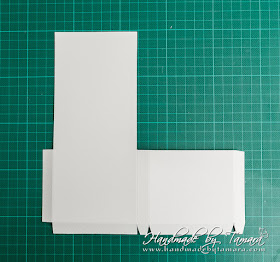
When you're done with your scoring, cut off all the unwanted parts. When finished you'll get a shape like on the picture.
Step 3:
Beacuse we want this tag to fit on the bottle we have to make a hole on the top of it. Take la-la land's stitched nested cirle (the 4th from the smaller to the biggest) and place it in the middle of the upper square. I used a stick it note to secure it on it's place, so it won't move. Then run your tag through your die machine. I simply folded the right side of the tag and it went through my Big Shot without any problem.
Step 4:
To decorate the tag you need 4 peaces of white cardstock and 3 peaces of design paper. Here are the measurments for cardstock:
3 3/8" x 2 7/8"
3 3/8" x 2 7/8"
3 3/8" x 2 3/8"
3 3/8" x 4 7/8"
... and for the design paper:
3 2/8" x 2 3/4"
3 2/8" x 2 3/4"
3 2/8" x 2 1/4"
3 2/8" x 4 3/4"
I usually take 1/8" smaller the first layer and then again 1/8" smaller the second layer (design paper).
Step 5:
Next you need to glue together cardstock and design paper. I cut the hole into design paper after I glue them together!
Step 6:
Prepare all the die cuts. To decorate this tag you need:
2x heart doily (one from cardstock and one from design paper)
2x stitched circles (the biggest two)
2x autumn leaves (cut from design paper)
1x love Owl Tag (you can use any kind of small hearts)
Step 7:
I put double sided adhesive on the flaps.
Step 8:
Glue all squares with design paper to the tag. Use double sided tape to glue the small lacy borders on to the sqare. Then cut off all the excess and glue it on to the tag.
Step 9:
Put foam dots to stitched circles and the inside of the heart doily (the one cut from the design paper).
Glue white heart doily straigt to the back of the tag (on the pocket) and then put the heart with the foam dots over the center od the heart doily.
Take leaves and flourishes and put them behind the circles. Cover each side of the circles with a small peace of cheesecloth. Use foam dots for image too.
Step 10:
Remember that heart owl tag? Well, all you need from it are those tiny hearts that fall off when you let it through your die cutting machine. Glue them to Marci's heart banner. Cute, huh? I used Sweetheart Marci for this tag.
Step 11:
Glue Marci to the circles and add paper flowers. Then all you have to do is to asemble the pocket and glue it to the tag (I already out double sided tape on at step 7). At the end put some glitter glue on Marci's buttons and that's it.
... and the back
That's it from me today. I hope you'll try and make this bottle tag with pocket. As you see it's super easy to make and it can be used for a lot of different occasions.
Hugs,
Tamara
Hugs,
Tamara


No comments:
Post a Comment