Hi all - Debbie here with our first tutorial for 2014.
I have been asked many times how I manage to cut so neatly around my images - it's no secret - I CHEAT!!! I have dodgy eyes and often start seeing 2 sets of scissors when I try to fussy cut so I talked my dear hubby into letting me have a Silhouette Cameo. One of it's many features is a print and cut option. I LOVE this feature and use it ALL the time.
Today I am here to show YOU how to use it too. This post is fairly picture heavy because they say a picture tells a thousand words and they make much more sense than I could!
Apart from just the print and cutting I will also show you how to remove the white box that comes around the La-La Land digis - this way you'll be able to squeeze your images closer together and make the most of your colouring paper.
Are you ready????
Here goes........
Note - if you click on the pictures you'll open them up bigger if you need to see more details.
To get your image into your Cameo you open up the files. You won't see anything here yet because it will only show silhouette files. You'll need to find the "All files" tab and select it - then your images will appear and you can make your selection.
I've chosen Tea Time Marci here. She'll drop in onto the cutting mat which is the white square - but I have moved her over to the blue section to the left of the mat. You need to trace the image so go the the Trace tab and click on the Select Trace Area button.
Then choose the Trace button and you'll see red lines appear on top of the image. Note red lines are cutting lines. Needless to say you don't want to cut the whole image apart so we need to select what we do want to cut. I have enlarged the screen to make it easier to see what's going on - use the magnifying buttons on the top menu bar to do this.
Go to the Offset tab and select offset. This should place a red line around your image. To create a white border around your image once it's cut you need to change this to the desired width. Use the Offset Distance to change the settings. For these images I like to set it to 0.06 but this is a personal choice.
Move the printed image away from all the red cutting lines. Then click on the group of red lines and separate them out even further into trace lines and offset lines.
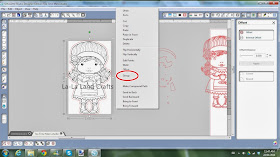
Select the offset group of cut lines and right click to bring up a menu. Select Release Compund Path to separate all the lines so they can move independently of one another.
Choose the lines you WANT to cut and move them over your B&W image. Here I've already moved the outline over and I also want to add the lines for cutting the space between her legs. Some images may have more or less extra pieces to cut so choose what you like.
Once you have centered all the cut lines over your image select the whole area and right click to bring up the menu. Click on Group to join all the pieces into one unit which will move together - whether it's for re-sizing or copying and pasting over.
To remove the white background go back to the Trace function. Select your Trace Area and then change the Threshold to 100% and click off the High Pass Filter. Press the Trace and Detach button and you should be able to move your image away from the white background. As I mentioned before this is a useful step when using more than one image per page as you can sit them closer together and maximize the space on your page.
You can save your image with it's cut lines now so you can pull her up to re-use for future projects without having to repeat all of these steps.
Slide your image onto the cutting mat and bring up the registration marks. These help the Cameo know where to cut on your page. Nothing will cut outside the red lines or in the shaded areas so you will have to make sure your images stay within the central area. You can alter the margins using the sliders although I personally have never tried doing this.
I only have A4 sized blending paper so I select the A4 option and usually prefer to cut in landscape position so I make that change too.
Note - The red lines off to the side from your previous work won't be cut as they are off the cutting mat - another reason to do all that work off mat - there's no need to delete it!
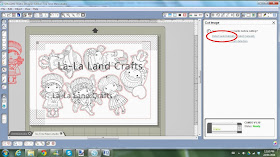
I then copy and past other images with their cut lines into my page and jiggle them around to make the most of the space.
Note the circled section - this image doesn't have the white background removed and it is covering over Fairy Marci's wing. So you can see it's handy not having the white background on your images.
Now it's time to print your image.
IMPORTANT
DO NOT MOVE anything on your mat once you have printed it out as it won't cut out right.
Load your printed sheet into the Cameo using the carrier sheet and follow the prompts onscreen once you hit the Cameo cutting option.
Detect the registration marks automatically - the machine will let you know if it's having problems reading them as it won't cut properly if it can't. Follow the prompts to cut, making sure you use appropriate setting for your paper.
And here are all my pretties cut out ready for a bit of colour :)
Well I hope you managed to stick it out to the end and I hope you have found some useful hints and tips here and give it a go yourself .
Some Trouble Shooting Tips
- I sometimes find I have to trace over my registration marks with a black fineline as they have printed too fine to read.
- Check all of your settings - if you are cutting an A4 sheet your settings must read for an A4 sheet.
Happy Colouring Debbie
xXx


Thank you for this! I've just got a Cameo and haven't been brave enough to try this feature yet... will follow your instructions and have a go! Hugs, Lisa x
ReplyDeleteI hope you do give it a go Lisa - I've taught a couple of the DT gals too and they LOVE this feature now :)
DeleteWow, great tutorial thanks Debbie. I think i have enough info now to give it a try :)
ReplyDeleteThe first time is the hardest - but then you wonder WHY you hadn't done it sooner LOL. Have fun!
DeleteWhat an awesome tutorial! I have wasted a lot of cardstock trying to print my images just the "right" way because I couldn't figure out how to do it on my Cameo. I think I'm going to give this a try this weekend. Thank you so much for all the time you have spent writing up this tutorial.
ReplyDeleteYou are VERY welcome :) Have fun!
DeleteThanks for your tutorial it looks really clear and easy to j dear stand I will have to give ita try with my Cameo. Susan
ReplyDeleteGood luck - let us know if you have any problems and we'll try and help out :)
DeleteThank you! This is very helpful!
ReplyDeleteThank you for so generously sharing these instructions! I am new to the Cameo and this will be very helpful; I haven't tried print and cut but this makes me feel much more comfortable giving it a go!
ReplyDeleteThank you for being so generous with your tutorial!
ReplyDeleteHi have been following your tutorial but get stumped every time trying to regroup my image after step 7 I get all my pieces together but when I right click group is in grey & I can't regroup PLEASE help getting so frustrated After this step I think I would be ok to go....
ReplyDeleteawesome tutorial thank you
ReplyDelete