Hi!
Tamara here with you. Today I have a fun tutorial for you. I'll show you how to make a small Summer album decorated with lots of la-la land crafts die cuts and a la-la land
crafts sentiment.
What you need:
white cardstock
design paper
scissors
scoring board
paper trimmer
liquid adhesive
enamel dots
3d foam pads
acetate
la-la land crafts items you need:
Sea Bubbles Border Die*
Sea Critters Die*
Ropes Die
Fancy Numbers Die
Under the Sea Die
Seaweed Die (Set of 3)
Koi Circle Die
Stitched Nested Circles Die
Pierced Scalloped Circles Die
Sea Critters Die*
Ropes Die
Fancy Numbers Die
Under the Sea Die
Seaweed Die (Set of 3)
Koi Circle Die
Stitched Nested Circles Die
Pierced Scalloped Circles Die
Step 1:
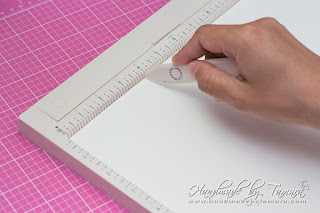
Take heavy white cardstock (280g) and cut out 12" x 12" square. Put it on your scoring board and make score lines at 4" and 8" on both sides.
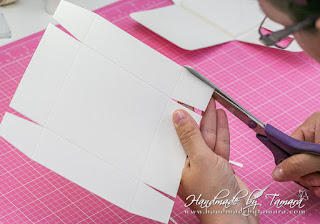
Cut out the corners, so that you get a cross.
Take corner chomper and cut all the outer edges.
Step 2:
Cut 9 squares from white cardstock, 3 7/8" x 3 7/8". Take your corner chomper and cut out edges on one side (repeat on 8 squares, leave one).
Step 3:
To make a lid you need a 7 1/8" x 7 1/8" square. Take your scoring board and make a 1.5" border from all sides or make scores at 1.5" and 5 5/8" from both sides.
Cut the corners like shown in the picture. This way the lid will adhere together without any extra edges sticking out.
Step 4:
Cut three rectangles from white cardstock. Two 3 7/8" x 12 1/8" and one 3 7/8" x 12 5/8". On the first two make score lines at: 3 7/8", 7 6/8" and 11 5/8". On the second one make score lines at: 0.5", 4 3/8", 8 2/8" and 12 1/8".
Make folds each on a different size (look at the picture).
Step 5:
Now you need to cut the design paper. Start with the lid. Mat every piece of design paper with a 1/8" bigger piece cut from a white cardstock.
For the lid you need:
1x (white cardstock) 4" x 4"
4x (white cardstock) 1 3/8" x 4"
1x (design paper) 3 7/8" x 3 7/8"
4 x (design paper) 1 2/8" x 3 7/8"
To decorate the inside and outside you already cut nine 3 7/8" x 3 7/8" squares, now you need to cut nine 3 6/8" x 3 6/8" squares from different design papers. Keep in mind you'll need 4 to decorate the outside and 5 to decorate the inside (4 with choped edges and one square).
Adhere the white square with matching design paper square.
Adhere them to the lid and base of the album.
This is your base before adding the accordion part.
Step 7:
Adhere the 0.5" flap on the bottom of the accordion part to the base of the album. Make sure that the sides close smoothly.
Step 8:
Cut 18 3 6/8" x 3 6/8" squares from different design papers and adhere them to the accordion part. I will add pictures of our Summer holidays here and then decorate the rest.
Step 9:
When you have the album finished you need to decorate the lid. Cut 6-8 frames made from Scalloped circles and stitched circles and use them for shaker.
Step 10:
I added no. 2018 to the side of the flap, because this album was made for this year's holidays. I used lots of different sea themed die cuts on the top and also a "Make a splash" sentiment from Jaws Because clear stamp set.
That's it from me. I hope you like my mini album.
Hugs, t.


No comments:
Post a Comment